G33K-TRICKS: Google
Showing posts with label Google. Show all posts

Friday, April 28, 2023

Understanding the Importance of the Google's EMM EnterpriseID and how to find EnterpriseID


Understanding the Importance of the EnterpriseID in Google's EMM Program and locate EnterpriseID


As more and more organizations adopt mobile devices and cloud-based services, managing and securing these devices has become a top priority. Google's Enterprise Mobility Management (EMM) program offers a solution for managing mobile devices and apps in the enterprise. One of the key elements of this program is the EnterpriseID, which is a unique identifier assigned to each organization that enrolls in EMM.
Google EMM EnterpriseID

So what exactly is an EnterpriseID, and why is it important for EMM?
An EnterpriseID is a unique identifier that is assigned to an organization when they enroll in Google's EMM program. This ID is used to identify the organization within Google's systems and is required for managing devices and deploying apps through EMM.

Why is the EnterpriseID important for EMM? There are a few reasons:

Device management: The EnterpriseID is used to manage devices in EMM. When devices are enrolled in EMM, they are associated with the organization's EnterpriseID. This allows administrators to manage these devices and apply policies and configurations to them.

App deployment: The EnterpriseID is also used to deploy apps to devices in EMM. When an app is deployed through EMM, it is associated with the organization's EnterpriseID. This allows administrators to control which apps are available to users and ensure that only authorized apps are installed on company-owned devices.

API integration: The EnterpriseID is used to set up the Google Mobile Management (GMM) API, which allows EMM administrators to manage devices and apps programmatically. This API is used to integrate EMM with other enterprise systems, such as helpdesk and inventory management tools.

Now that we understand why the EnterpriseID is important, let's take a look at how to find it. If you are the administrator of an organization that has enrolled in Google's EMM program, you can find the EnterpriseID in the Google Cloud Console or the Google Admin Console.

To find the EnterpriseID in the Google Cloud Console, follow these steps:

  • Log in to the Google Cloud Console with your EMM administrator account.
  • In the left-hand navigation menu, click on "IAM & Admin."
  • Click on "Settings" in the submenu that appears.
  • Under "Organization Settings," you should see your EnterpriseID listed.

To find the EnterpriseID in the Google Admin Console, follow these steps:


  • Log in to the Google Admin Console with your EMM administrator account.
  • In the left-hand navigation menu, click on "Billing."
  • Under "Subscriptions," you should see your EnterpriseID listed next to your EMM subscription.
  • If you do not have access to either the Google Cloud Console or the Google Admin Console, you may need to contact your EMM administrator or Google Workspace support for assistance in finding your EnterpriseID.

In conclusion, the EnterpriseID is a critical component of Google's EMM program. It is used to manage devices, deploy apps, and integrate EMM with other enterprise systems. By understanding what an EnterpriseID is and how to find it, EMM administrators can ensure that their organization's mobile devices and apps are secure and effectively managed.

Saturday, August 1, 2020

Complete Guide and steps to Install, Setup and Remove Test DPC app


how to uninstall test DPC

What is Test DPC

TestDPC / Test DPC is an app that is used for testing Device Policy Controller for Android Devices. This app was released by Google first in 2015. This app is smart enough to fool your Android device thinking that it is being used under a corporate context. If you are an Android App developer and want to test a specific behaviour of your app under the conditions when the device would be enrolled to Work Managed or Work Profile Mode by an EMM like WorkspaceOne Intelligent Hub.
Once you set the device to Device Owner or Work Managed / Work Profile mode using the TestDPC app, you can verify the remote app performance.
If you want to understand more on Work Managed and Work Profile, you can refer this article: Difference-between-Work-Profile-and-Work-Managed-Profile
And if you are here to see how to uninstall VMware Workspace One Hub, you can refer to this link - https://g33ktricks.blogspot.com/2022/09/how-to-Uninstall-vmware-workspaceone-Intelligent-hub-android.html

This app can be downloaded easily from the below official links and there are other links from where you can download it too.

Test DPC Git Hub Download Link: https://github.com/googlesamples/android-testdpc
The Source code is available for Free for this app in GitHub, so you can play around with it.

What Test DPC app does?

Android Device comes with Device Policy Controller (DPC) which controls most of the device Settings. These settings can be controlled manually, that you do from Settings but these can be also can be controlled by Enterprise Mobility Management) ISVs (Independent Software Vendor) OEMs (Original Equipment Manufacturer) 
Users can manage security polices , can set applications restrictions and much more things using this app. It also has as a implementation reference for other DPCs.
For using Test DPC app, device Rooting is not required.

List of APIs available in Test DPC app

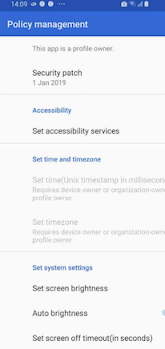
Below are the images from the Test DPC app 7.0 and the complete list of Policy Management APIs available within the app. Few of the setting in the main menu will have Sub-Settings which are not included in the list of screenshots.
 
Here is the list of few of the DPC commands followed by Screenshots from the test DPC apk.
Suspend apps, Unsuspend apps, Clear app data, Managed configuration, Disable metered data , app feedback notification, App restrictions manager,  Delegated cert installer, generic delegation, lock task mode, Manage app permissions,Wipe etc.

.
List of APIs Methods available in Test DPC app                   List of APIs Methods available in Test DPC app                List of APIs Methods available in Test DPC app


List of APIs Methods available in Test DPC app                 List of APIs Methods available in Test DPC app               List of APIs Methods available in Test DPC app

List of APIs Methods available in Test DPC app                 List of APIs Methods available in Test DPC app              
List of APIs Methods available in Test DPC app                 List of APIs Methods available in Test DPC app          
List of APIs Methods available in Test DPC app                 List of APIs Methods available in Test DPC app               List of APIs Methods available in Test DPC app


Installing test DPC

For setting the device to Device Owner or Work Managed Mode, you can use the adb command without factory resetting the mobile device. The Current or the latest version available is for test DPC app is 7.0.

Steps for Installing testDPC app from Google Play Store

- To install, you must connect your Gmail account to your Android device.
- To download from Play Store
- Click ‘Accept’ for permissions and let it download
- Once Test DPC is installed from Play Store. 
- Follow the steps below given in the   Test DPC Initial Setup section

Steps for Installing testDPC app via command line via apk

- After downloading, go to Device Settings and then Security.
- Search for ‘Allow installation of apps from unknown sources’ and enable the option.
- Install any APK using below steps
  (Here is the complete guide to setup ADB on your machine - https://www.xda-developers.com/install-adb-windows-macos-linux)

- Install the DPC apk from adb
 adb install <TestDPC.apk>

- And run below command to set the dpc app as Device Owner.
 adb shell dpm set-device-owner com.afwsamples.testdpc/.DeviceAdminReceiver

- In case you want to test the Profile Owner mode, you need to run below command instead of above Device Owner command
 adb shell dpm set-profile-owner com.afwsamples.testdpc/.DeviceAdminReceiver

Test DPC Initial Setup:

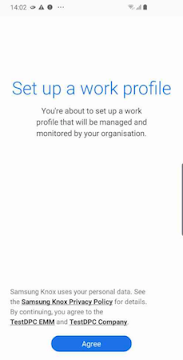
Below screenshots would explain you the initial setup.
Launch the Test DPC app after installing and follow the instructions as given below.

Installing and settting Test DPC app             Installing and settting Test DPC app            Installing and settting Test DPC appInstalling and settting Test DPC app            Test DPC in Personal container              Test DPC in Work Profile


Test DPC is one of the best Device Policy controller for Android devices and it is compatible with devices running on Lollipop (Android 5.0) and higher. 

Uninstalling / Removing Test DPC apk

 By now you must have understood, this app is very useful but I would suggest you to uninstall it once you are done with your work. Keeping it on your device and playing around it might land you in trouble.
Here are the steps to follow for removing the Test DPC app/apk.
From the below screenshot from the device you can see that there is a Wipe Option to clear the dpc set up from the device. Please note, WIPE DATA will factory reset and delete all the device data, so instead of running Wipe, use following given dpc remove active admin adb command.

                                                             Test DPC Wipe option
- Launch the Test DPC application 
- Search for "Wipe" option 
- Click "Ok" on the prompt
- Remove the test DPC Apk from Device Apps list,  Go to Device Settings > Apps > search app and click Uninstall

adb shell dpm remove-active-admin com.afwsamples.testdpc/.DeviceAdminReceiver

 I see that people do look for removing other DPC apps like thinkadam dpc, Intelligent Hub from VMware or Microsofts Intune. Just to let you know, there is no way to remove these apps. If your device is enrolled as Device Owner, un-enrolling it would factory reset the device. If its enrolled as Profile owner there are chances but the only thing that blocks it is ofcourse the IT team of your company. If they have installed it on your device, they do not want it to remove it. If you want the DPC apps like mentioned above, to be removed from you mobile device, you need to contact to your IT team. 

NOTE: Sooner, the testDPC will be out of sight and will be over taken by AMAPI. The new concept that would control your device instead of DPC apps. Click here , if you want to learn more about AMAPI.

You might also like to look at this quick small article on Android emulator Camera Surprise : Android-emulator-camera-surprise

Friday, July 10, 2020

[Resolved] "You don't have permission to complete this action" while adding Payments


How to Resolve "You don't have permission to complete this action [ OR-AC-04 ]" while adding Blogger/Blogspot Payments


So while adding Adsense Account, I encountered this issue while adding the bank account details.
I did a research and could not find a relevant answer to this issue.
Although I was the only account holder for this Adsense account, I was not having permission to add Bank Details in the Payment Method

Even when I was moving across payment screen, I was getting this error.
"Uh oh. There was a problem.You don't have permission to complete this action [OR-AC-04]
cc7ab14e22e0f7e9"


Solved - you dont have permission to complete this action in blogger

Solved - you dont have permission to complete this action in blogger


To resolve this I tried to search across different Google threads but could not find much information.
Even though I had the permission for this blog and I was the only owner, it was frustrating to see that I was not able to my own account to the Google Payments.
After few trials to save the Payment settings again and again, I closed the browser and opened up Firefox.
Logged in with the same account and tried adding the Payment details.
To my surprise, it worked! 
So, here is solution you can try. You just need to login to your blogger account with another browser and you should be able save the Payment settings.

Friday, June 5, 2020

[Solved] How to fix the missing Address bar


Quick TIP to Resolve disappeared URL bar

Every Browser behaves strange including Google Chrome. I had an instance where address bar went missing and I had no clue how to bring it back. Funny isn't it! How will you search google query to fix the problem. (Ofcourse! you can try another browser :) ).                               
Below are the solution which you can try to resolve the disappeared URL Address Bar
  • Browser has full screen mode and you might have pressed F11 to take your browser to full screen mdoe. Press the F11 key to exit fullscreen mode. The address bar is not visible when the Internet browser is in fullscreen mode.
  • In case you are 'stuck' with  IE - Internet Explorer, then you have to  click the  View or Tools in the menu bar  which will can be seen at the top of the browser window screen, then  click on Toolbars, then select Address or Address bar. If the Menu bar is missing, press the Alt key to make it visible.
  • Alternate way would be to find the Add-ons OR Extensions which you might have installed in your browser which must have set the address bar/ URL bar hidden. With trial-error method can can find out which add-on has caused it and keep it Disabled. You can click here to know more about - How to remove Browser Extension
  • Finally, if none of the above g33ktricks does not work, the browser must have gone bad and Uninstalling and the re-install should fix the issue for sure.