G33K-TRICKS: Softwares
Showing posts with label Softwares. Show all posts

Tuesday, July 16, 2019

How to Login VMware Airwatch Console from your Mobile


VMware UEM Console Login from Mobile


Simple way to access VMware Airwatch WorkspaceOne UEM Console from your Mobile web browser.
Airwatch WorkspaceOne UEM console
As an Airwatch Admin, sometimes you would be looking for a way to access your Airwatch workspaceone UEM console from mobile but when you enter the console address in mobile web-browser like Chrome,


Firefox , the console redirects the page and takes you to the (https://<YourConsoleAddress>/DeviceManagement/Enrollment/ ). The screen would look like the one shown here.
Enrolment screen UEM console

Note that, this is not strage behaviour . As a MDM , Vmware Airwatch must be having a way to enroll the device via web-browser. So this redirection to enrollment page is obvious. Once you enter appropriate Group ID i.e Organisation Group ID , the next page would be to download , Install and Run Workspace One Intelligent Hub from Google Play Store.
But this is what we dont want.
To get an access to the console login page,
you need to append /Airwatch to the console address.


So the address would be  https://<YourConsoleAddress>/Airwatch
This would take you to the admin login page.
Please note that Loging in from mobile web-brower might not render the pages correctly and you might see some glithes. My recommendation would be to Login the page from Desktop Browsers only.

WorkspaceOne UEM mobileUEM console Mobile Login Screen


Thursday, October 18, 2018

How to Setup SFTP server for Free


What exactly SFTP is? And how to Setup SFTP Server


SFTP (SSH File Transfer Protocol) is a secure file transfer protocol and it runs over the SSH and comes with all auth and security that ssh supports. Now-a-days FTP or FTPS is getting replaced by SSH as FTP is considered as not so secure.

The SFTP protocol runs over the SSH protocol as a scheme and it was designed by Tatou Ylonen.
setup SFTP ServerSpecial thing about SFTP is , there are no ports exposed.

SFTP VS. FTPS

People usually wish to check SFTP vs. FTPS. FTPS is essentially the previous ftp protocol run over SSL (Secure Sockets Layer) or TLS (Transport Layer Security).

Benefits of FTP over SFTP includes,
FTPS is essentially FTP, which implies it's code mode, which might corrupt files if the mode isn't properly set and SFTP runs over SSH within the normal SSH port. Thus, no extra ports have to be compelled to be opened on the server and no extra authentication must be maintained. This simplifies configuration and reduces the probability of config errors.
FTPS wants sophisticated firewall configuration and might not work NAT. Ports 989 and 990 have to be compelled to be open. 
FTPS needs an additional server software system package to be put in and patched, whereas SFTP comes with SSH.
What's more, FTPS supports each active and passive modes , that additional complicates firewall configurations and is susceptible to issues.
FTPS can't be used as a File system. 


Here are easy steps to setup Free SFTP server

To setup the Free SFTP server you can download the Rebex Tiny SFTP server
from https://labs.rebex.net/tiny-sftp-server
And surprisingly, it is free for Commericial and Non-commercial purpose.
Once download is finished, unzip the zipped file and run the "RebexTinySftpServer.exe" file.
There would be another file named "RebexTinySftpServer.exe.config" file which is a server configuration file with below config settings available by default.
The configuration is straight-forward , key-value pair and easy to understand.

<?xml version="1.0" encoding="utf-8"?>
<configuration>
<appSettings>
<!-- user and root dir -->
<add key="userName" value="sftpuser"/>    
<add key="userPassword" value="sftpuser"/>
<add key="userRootDir" value="data"/>

<!-- user public keys for public key authentication (optional) -->
<add key="userPublicKeyDir" value=""/>

<!-- misc config -->
<add key="showUserDetailsOnStartup" value="true"/>

<!-- security -->
<add key="rsaPrivateKeyFile" value="server-private-key-rsa.ppk"/>
<add key="rsaPrivateKeyPassword" value="my-super-secure-password"/>

<add key="dssPrivateKeyFile" value="server-private-key-dss.ppk"/>
<add key="dssPrivateKeyPassword" value="my-super-secure-password"/>

<!-- port -->
<add key="sshPort" value="22"/>

<!-- start server when application is started? -->
<add key="autoStart" value="false"/>
</appSettings>

</configuration>

As SSH works on port 22 so config also has the same.
For further security , you can create RSA and DSA keys (.ppk) and provide the password in config which was used while creating the keys.
If you are not comfortable in creating the SSH keys, you can you this awesome free tool that runs on Windows called "PuttyGen" (a utility for RSA and DSA key generation )

Link to download : https://www.chiark.greenend.org.uk/~sgtatham/putty/latest.html

If you are working with any SFTP client and you are just looking for test connection with SFTP Server, you dont need to host one. Rebex has already provided a dummy sftp running server at
test.rebex.net  Use demo as username and password as password


Please Note: REBEX SFTP server store the password in clear text as you can see from the config file.
Do let me know if you have any other SFTP server that can be easily setup.
Incoming search: Rebex sftp firewall issues


Sunday, November 13, 2016

How to Speed Up Chrome Browser Quickly


Speed-up your Chrome Browser to load page faster


How to make Chrome fastAs you may know, Chrome is one of the popular browser available to us and it is also among the fastest browser. You also might have used it or maybe you are using it now as well and can feel the difference of speed compared to other Web Browsers.
The fact which you might not know is, Google Chrome uses DNS prefetching and speedy (SPDY) protocols instead of HTTP. DNS prefetching and SPDY protocols helps to load the webpage in advance which reduces the time to load the page.
If you are reading this page means something went wrong with your Chrome browser. After using it for many days it tends to slow down. Lately, it has been observed that Chrom has been consuming high amount of RAM even if there is only one tab opened. Offcourse, it does lot in background so consuming high memory is not a surprise.
So, here are the things which you can do to fasten your Chrome Browser application for your desktop machine. This should work for other browsers too.

1. DISABLE THE  PLUGINS or ADD-ONS 

Having many plugins enabled in your browser can slow down it easily as it consumes time to load each and every plugin and moreover it consumes you RAM usage as well. So the best option would be to load the important plugin which you really need and disable the rest. I presonally prefer running zero plugins.
This is how you can disable it.


a. Open Chrome Browser and enter the following address into address bar

chrome://plugins/

b. Now you can Un-tick all the plugins which you think are not at all useful to you.
Please do remember that few plugins like Adobe Flash is required for many websites to display content so you should not disable it and there are some other plug-ins which can help your browser to increase performance.


2. DISABLE EXTENSIONS


a. Open Chrome Browser and enter the following address into address bar

 chrome://extensions/

OR

Click on Wrench icon on your toolbar > Tools > Extensions.

b. Un-tick the extensions which are not needed or can be deleted as well if not required.


3. CLEAR YOUR BROWSING DATA

Browsing data consumes good amount of space. Everytime you visit a webpage, some amount of data from the webpage will be saved on your system so that when you visit the same page again, the data can be loaded quickly. But if your not clearing your browser data, the data continues to increase thus slowing down your browser.

Although cache and cookies are really made to speed up chrome browser but sometimes it happens that they are responsible for decreasing your browsing speed and lagging while opening webpages.


This is how you can clear the data

a. Click on Wrench icon
b. Go to Tools > Clear browsing data.
c. Choose Time range in the dialog box and click on "Clear browsing data"

OR

a. Go to Settings
b. Search for "Clear browsing data"
c. And appropriately select the data that needs to be cleared.

4. Disable any ToolBar you have added to your Browser

Toolbars are your worst enemy. They stay on your browser and do nothing. Toolbars can really slow down the system and the browser. Moreover, I feel toolbars should not be installed at first place.

The Above tips works well for the other browser like FireFox and Internet Explorer as well. Only the path to change the settings will vary.

Hope you like the tips shared. Please do add any other tips if you have in comments.

You can set the Chrome to Dark mode . Check it out here

Thursday, October 27, 2016

How to make mobile a webcam


Make your Mobile phone camera a Webcam

During this Corona virus Pandemic (Covid19), people have been asked to work for home and you will feel the need of having a webcam some or the other day. Teleconferencing gets easier when you see the other person face to face rather than having the voice converstation.
Not everyone has a laptop and not everyone has a Desktop PC with a Webcam. Now a days, not having a camera/webcamera is a big deal. Attending Zoom Calls,Skype Calls, Facebook Live streams and many other applications and website demands you to have a webcam.
How to make your mobile a webcameraWhen I say a webcam , its just a camera which can stream you over internet, hence the name 'web camera' aka webcam.

So, here I am going to tell you about a simple application that I have tried and tested to make your mobile phone as webcam and save money.
As I am talking about Skype video call, I think I should call this post of mine as "How to use Mobile phone as a webcam"


IP WEBCAM
This one is simple yet elegant application which you can install on your android phone from the Play Store.
IP Webcam turns your phone into a network camera with multiple viewing options. View your camera on any platform with VLC player or web browser. Stream video inside WiFi network without internet access.


Features include:
• Video can be uploaded directly to Dropbox, SFTP, FTP and Email using Filoader plugin
• Several web renderers to choose from: Flash, Javascript or built-in
• Video recording in WebM, MOV, MKV or MPEG4 (on Android 4.1+)
• Audio streaming in wav, opus and AAC (AAC requires Android 4.1+)
• Motion detection with sound trigger, Tasker integration.
• Date, time and battery level video overlay.
• Sensor data acquisition with online web graphing.
• Videochat support (video stream only for Windows and Linux via an universal MJPEG video streaming driver)
• Cloud push notifications on motion and sound, cloud recording for motion-triggered records, online video broadcasting powered by Ivideon.
• Extensive baby and pet monitor features: night vision, motion detection, sound detection.

Here is the link for IP WEBCAM. Install the app on your smartphone and Launch it.
There are plenty of things which are there in the mobile app, which you don't need to worry about.

Next Step is to Download the configuration software.
Download from https://ip-webcam.appspot.com/

After installing the PC app and launching it, below screen will be shown
Click on Auto Detect.

Settings window

If everything works fine, the camera will be available in Windows software. If something is wrong, please check your firewall rules and your network by visiting your network camera in a web browser.

For example, in skypeTry restarting your PC if it does not work.
After restart, launch any application
say Skype and you can then configure your skype with the IP Cam.
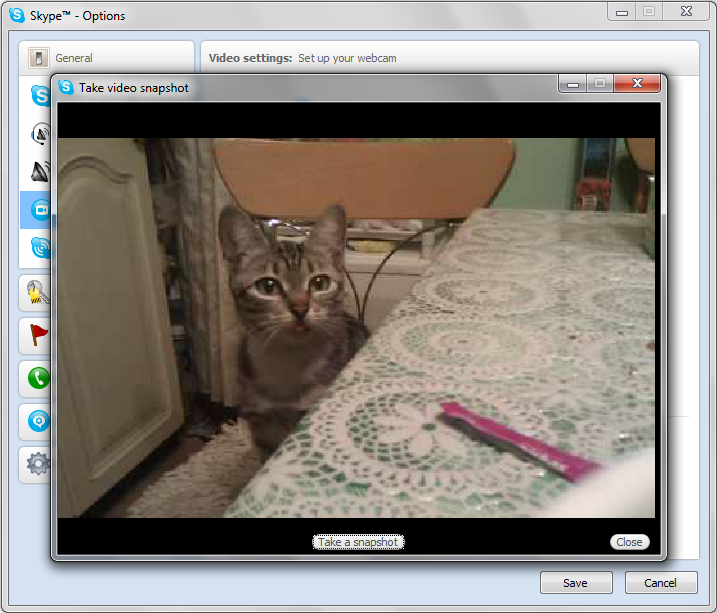
In Skype, Go to Tools - Options - Video Settings .
Here You need to choose, MJPEG Camera
And Baam!!! all done.

You can see your pretty cat over your PC by using your phone.

In the similar way, you can config any Streaming application . You just need to use MJPEG camera as a webcam source.

Another App I remember which you can use is, 
DroidCam. It also has mobile app and a PC connectivity software.

Tuesday, March 22, 2016

How to disable Microsoft OneDrive


Disable MS OneDrive

Steps to Disable Microsoft OneDrive 


Are you annoyed of Windows 10 Microsoft OneDrive.

You have come to right place.
There are many ways to
disable Microsoft OneDrive and Remove OneDrive from File explorer.


For Windows 10 Home Edition this is what you need to do.

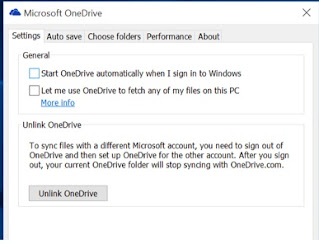
Right-click the OneDrive icon in your notification area (little white cloud) and then choose Settings.
Disable MS OneDriveUncheck the “Start OneDrive automatically when I sign in to Windows” Option and save your settings.
OneDrive won’t load at Windows Startup from now on..
If you are not planning to use OneDrive, you can click on the “Unlink OneDrive” button .
It will stop OneDrive from syncing to the Clouds.


For Windows 10 Professional  or Enterprise or Education Edition you need to ,
Press the Windows key to open the Start menu’s search box.
Type "gpedit.msc"and press Enter
This will open the Group Policy Editor.
Now go to :

Local Computer Policy > Computer Configuration > Administrative Templates > Windows Components > OneDrive

Now, Double-click on the “Prevent the usage of OneDrive for file storage” policy setting in the right pane and click on “Enabled” and then click  on “OK”

It will disable the access to OneDrive. OneDrive will be hidden from File Explorer.

Sunday, March 20, 2016

Ethical hacking of web sites using "HEXJECTOR"


Hexjector is an Opensource, Multi-Platform PHP script to automate site Penetration test for SQL Injection Vulnerabilities.


The Tools has following features...

1.Check for SQL Injection Vulnerablities.
2.Pentest SQL Injection Vulnerablities.
3.Web Application Firewall Detector.
4.Scan For Admin Page
5.Manual Dump Function
6.SQL Injection Type Detection
7.Search For Vulnerable Sites by using Google Dork
8.WAF Bypass
9.Multithreaded(HexaFind)


Download Hexjector here:-  sourceforge
Webhacking made easy with Hexjector.

Wednesday, February 3, 2016

How to Install Numpy python module on Windows [SOLVED]


Simple, tried and tested steps to install Numpy module


Pre-requisite, would be "You are already having Python installed on your system"
Next Download the Numpy module from https://pypi.python.org/pypi/numpy
 [I downloaded the Zipped one, so can you  ;) ]

Unzip the downloaded Numpy and go to
C:\Users\<USERNAME>\Downloads\numpy-1.10.4\numpy-1.10.4
using command prompt. This is where setup.py is available.

Now type commands,
python setup.py build

If building does not throw any errors , run
python setup.py install

In-case you see some error similar to error: Unable to find vcvarsall.bat
Which implies you dont have Microsoft Visual studio to build the module.

Either you can download one or there is another way of doing it.
Download, MinGW (32/64) from http://sourceforge.net/projects/mingw/files/

Select ‘download latest repository catalogues’.
Next you select a folder (i.e. C:\MinGW) and the programming support you require: C and C++  (I kept Fortran and ObjC as deselected).
You need "MinGW Developer Toolkit" installed.
If you select this option you’ll get MSYS as well.
H
Next thing you need to do is to configure your PATH environment variable.

Right-click on My Computer and Select Properties
Go to the tab ‘Advanced’ and select ‘Environment variables’
Select ‘Path’ from the ‘System Variables’ and click the ‘Edit button’
Add the following paths to your variables: ‘C:\MinGW\bin;'  (without quotes)

Now, Edit / Create new file  "distutils.cfg" at C:\Python26\Lib\distutils\distutils.cfg with following change

[build]
compiler=mingw32

Remember, in case you created new file distutils.cfg , the file type should be CFG not TXT
To avoid this, while saving select "Save As" option and then in the "Save as Type" drop down select
"All Files" . Then in the "Filename" field type distutils.cfg and then save.

Open new command prompt and again go to  C:\Users\<USERNAME>\Downloads\numpy-1.10.4\numpy-1.10.4
Run, 
python setup.py build

And if no issues seen,
Run,
python setup.py install


And its Done!!!


Sunday, January 20, 2013

How to register SSH key on Launchpad.net


Launchpad is a web application and website that allows users to develop and maintain software, particularly free software. Launchpad is developed and maintained by Canonical Ltd. (http://en.wikipedia.org/wiki/Launchpad_(website)


For HELP you can also visit


Open terminal in your ubutu-box and type:
1. sudo apt-get install openssh-client
2. ssh-keygen -t rsa ( to create dsa key,
 type ssh-keygen -t dsa)
3. When prompted, press Enter to accept the default file name for your key. Check the path where the key is stored or else define the path yourself.
4. Press Enter to confirm a password to protect your SSH key.
Your key pair is stored in ~/.ssh/ (or the path you've mentioned) as id_rsa.pub (public key) and id_rsa (private key)
5. Open the id_rsa.pub in any text editor, and copy the contents


6. Now , open https://launchpad.net/people/+me/+editsshkeys   to paste your copied SSH key in the text box provided in the page.
7. Click on "Import public key" button to continue.

Your SSH key is now saved. You will also get a mail for the change is ssh key into your mail box which is registered with the Launchpad.

On the same page you can remove your SSH key and can add new one.
Just select the key to remove and click on "Remove"

You can also see "How to Add SSH key to GIT"

Sunday, September 30, 2012

Google Talk - Tricks and Shortcuts


GTalk Trick and Shortcuts


 Days of Yahoo Messenger are over. Everyone now a days use Gtalk!!
 Am I Right!!! I guess so :)

And if you dont have Google talk . Download it here

So here I am with few Gtalk Chat Shortcuts or you can say tricks

GTalk Shortcuts


Tab  -->  Switch through the currently open chat windows
Esc --> Close current chat window
Alt + Esc 
 -->  Close all chat windows
F9  -->  Open Gmail
F11  -->  Call
F12  -->  End current Call

Text Formatting


Italic Text -->  type  text between two underscores. eg. _ITALIC_ = ITALIC

Bold Text 
-->  type the text between two asterisks. eg. *BOLD!* = BOLD

Below ones are new to me as well :)

GTalk Startup Parameters


To add some extra features to GTALK, you can add some parameters when GTALK is launched.


To use the parameters, just edit the Google Talk shortcut on your desktop, and add any of the following parameters after a slash(/) 
Go through the following screenshot for "how to do"

Right Click on Google Talk Shortcut on Desktop


Click Properties


Edit the " startmenu" in the Target Field with any of the following parameters


checkupdate --> Check for updates to the current version

diag --> Run GTalk in Diagnostic Mode

nomutex --> Open more than one instance of GTalk at a time
factoryreset 
--> Load default settings
mailto user@gmail.com 
--> Send an email using GMail

Thats it for now!!! Enjoy Chatting :) 

Friday, July 6, 2012

Unlock and Multitasking on Nokia S40 phones


Following are steps that will help you unlock your nokia phone and then Multitask any java application you want. Your phone will not ask you to exit when you press Red/End Key.
Nokia Lumia g33ktricks

P.S.: Multitasking works only on S40 v5 and higher phones,but you can hack security of any s40 phones
Do it on your own Risk!!!
Unlock and Multitasking on Nokia S40

Sunday, July 1, 2012

Reduce the Brightness of your Monitor


How to Control your Screen Brightness in better way


You must be knowing the ways to lower the brightness of your computer monitor.

But what if you want to decrease the brightness more than the lowest possible. Kinda Night Mode for you Computer Screen.

Here is a small program that will lower the opacity of the screen resulting low brightness making your eyes comfortable to the screen light.
Download : Bright Monitor.
Size: 18KB

Monday, November 1, 2010

Avast - A Free Antivirus


Antivirus for Free

Who does not want Freebies. Here is one of best free AntiVirus available on internet.
You can follow these steps and get the full Antivirus on your system.

If you want free antivirus, go to www.Avast.com
1. Download the antivrus from the Download section
2. Install and run the antivirus program
3. Goto settings and select, get activation key option.
4. Fill up the small form and provide correct email ID.
5. Get a activation key into your e-mail inbox.

Activate your Avast Antivirus and get rid viruses.