G33K-TRICKS

Friday, August 16, 2019

Windows Snipping shortcut in Mac OSX


How to Take Screenshots on Mac OSX

Windows has great deal of features which Mac does not having matching with. Like the MS Paint that is on Microsoft Windows but the equivalent for Apples Mac which is "Preview.app" is not so great.
Microsoft Windows10 has introduced the versatile Snipping tool that can quick take a screenshot or part of the screenshot which can be saved or directly copy pasted in MS Paint or Word etc.
The easy shortcut that can be used to do Screen Snipping on Windows operating system is Windows key + Shift + S
But when it comes to Mac's OSX as a new user I found it after lot of search.
There are three ways to take screenshot on Apple's Mac machines

1. Command + Shift + 4 then Space Bar 
This takes the complete screenshot of a screen. Once you hit the Space bar , the Mouse Icon would change to Camera Icon


2. Command + Shift + 4
This would allow you to select portion of the screen take as a snapshot. Usually, these screenshots get saved to the Desktop

3. Adding Control Key i.e Command + Control + Shift + 4 


This would allow you to create the snapshot and keep it in the Clipboard
From Clipboard , you just can paste it anywhere you want. That means, you dont need to save the file on Desktop to use it.

And then there is Screenshot.app which is built-in in MAC machines. The above shortcuts uses the same app.

With all new upgrade from Apple, macOS Mojave has one more snipping shortcut.
It is Shift + Command + 5 , this would launch the screenshot.app itself where you can do more than just taking the screenshots. The tool includes, Recording the entire screen or just a portion of the screen

Tuesday, July 16, 2019

How to Login VMware Airwatch Console from your Mobile


VMware UEM Console Login from Mobile


Simple way to access VMware Airwatch WorkspaceOne UEM Console from your Mobile web browser.
Airwatch WorkspaceOne UEM console
As an Airwatch Admin, sometimes you would be looking for a way to access your Airwatch workspaceone UEM console from mobile but when you enter the console address in mobile web-browser like Chrome,


Firefox , the console redirects the page and takes you to the (https://<YourConsoleAddress>/DeviceManagement/Enrollment/ ). The screen would look like the one shown here.
Enrolment screen UEM console

Note that, this is not strage behaviour . As a MDM , Vmware Airwatch must be having a way to enroll the device via web-browser. So this redirection to enrollment page is obvious. Once you enter appropriate Group ID i.e Organisation Group ID , the next page would be to download , Install and Run Workspace One Intelligent Hub from Google Play Store.
But this is what we dont want.
To get an access to the console login page,
you need to append /Airwatch to the console address.


So the address would be  https://<YourConsoleAddress>/Airwatch
This would take you to the admin login page.
Please note that Loging in from mobile web-brower might not render the pages correctly and you might see some glithes. My recommendation would be to Login the page from Desktop Browsers only.

WorkspaceOne UEM mobileUEM console Mobile Login Screen


Tuesday, July 9, 2019

How to set Dark Theme for Google Chrome mobile


Set Dark Theme on Chrome Mobile Application

One of the most used and famous browser everyone knows of is Google Chrome. The browser supports multiple platform like Windows, Mac, Android, iOS. The ease of use and quick webpage rendering and hundreds of useful extensions makes it highly used web browser.

Coming back to the topic, as of now Google has no roadmap to allow user to Set Dark Theme, so, here are few g33ktricks to allow you to set the Dark Theme OR set Night Mode on Android Chrome browser.

1. Set Dark Theme using Chrome Flag

1. Update the Chrome to the latest version from Play Store.
    Open PlayStore app - > Search Google Chrome -> Click on "Update" button

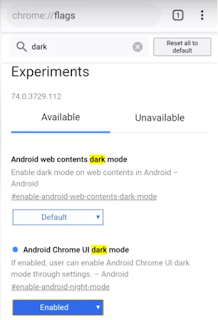
2. Open the Browser and type the URL – chrome://flags
Chrome Flags Setting Page
Chrome Flags Page
3. Now Search for the term ‘Dark’.

4. Two options will be shown
Android web Contents Dark Mode
 and
Android UI dark mode.

5. Web Contents Dark Mode - This will make the content on the website dark
UI dark mode - This will make the Chrome UI dark leaving the content on the site unaffected.

6. Make your choice accordingly. Close the Google Chrome app and the Launch it again.

7. The Night Mode or Dark Theme will be set and the webpages will be having black background and white text.
You can reset this setting back by opening Chrome Settings and click on "Dark Mode" option.


2. Using Reader Mode

Reading mode shows the webpages like pages on the book providing ease of reading by removing Javascripts, ads etc.

Steps to enable Reader mode

1. Open Chrome app and Tap 3 dots on the Right-Top of the screen

2. Click on "Settings"

3. Search for "Accessibility" option and swithch-on the "Simplified" view.

4. Now Open any of  the web-page you like. Bottom of the screen will shown an option ‘Show Simplified View’. Click on it.
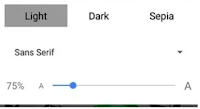
Chrome Flag Appearance Option
5. This will again show "Appearance" option again.

6. Simply increase the intensity of Dark in the given options.


You might like to read: How to Speed-up your Chrome Browser

Sunday, April 7, 2019

Top 5 Killer YouTube Tricks


Top Five awing YouTube Tricks that will blow your mind

I am listing down here few Killer Youtube tricks that I am definitely sure you would need someday.

1. Generate a youtube-link that starts a YouTube video at a definite certain time.

Ever wished to send somebody a YouTube video, however purpose them to a selected moment or timeframe in the video

Instead of causing your friends the final YouTube link and instructing them to jump to the 0:34 minute spot, you'll really send them a selected YouTube time-link that would get started from the point whichever you have shared them.

Here are the Steps to follow:

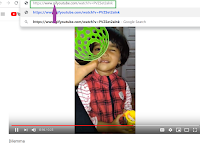
Youtube Time Stamp
Youtube Video Time Stamp
To create a link that starts a YouTube video at a definite time: Open up the video and click on "Share" to the way right of the video title. Then, within the window of choices that is shown check the box next to "Start at:" and kind within the time (in hours:minutes:seconds) you wish. As an alternative, you can pause the video at the time you wish it to start and autofill will help.


On  click,  you will see a tag add itself to the YouTube link. Merely copy that link and paste it where you need or share it on any network.

2. You can convert any YouTube video into a GIF


gif-youtube-video-trickEveryone loves GIFs, however knowing the way to build them is not public knowledge. Well, it ought to be, as a result of all it takes may be a very little YouTube trick.

To create a GIF from a YouTube video: play a video on YouTube  just add the word "gif" right before the name of the youtube link.
Thus the link reads, "www.gifyoutube.com/[video-link]"


This will bring you to gifs.com, together with your video already uploaded and prepared for writing. Here, you will find a menu of choices to the left pane. At Gif.com you can do multiple things like, edit, crop, set time of the video etc.

G33k-trick to form a GIF from a YouTube video.

Click on "Create GIF" on the top-right and it will prompt you for a GIF title and set of tags. Then click "Next," and you've got a handy landing page from that to share your newly minted GIF. Only small catch here is you need to signup to gif.com to download the video.


3. You can facilitate your video get found in search engine by writing or uploading a transcript. 

This is one of the Youtube SEO hack shared by Ryan Stewart who suggest , if possible , you can upload the Transcript of your video in the description of your YouTube Video to get higher rankings in search engine listing. This is because, Google scrutinize variety of things once ranking videos in search to work out what your video is concerning, and your transcript is one in every of them.

To add a transcript to your video: Open the video on YouTube, and you will see a row of icons just under the play button. Click the icon on the way right for "Subtitles/CC." (CC stands for "Closed Captions.) YouTube closed captioning (CC).

Set your language if you haven't already. Then, you may then be prompted to decide on among 3 other ways to feature subtitles or closed captions to your video ...


Upload a pre-written text transcript or a regular subtitles file. (Learn a lot of concerning the file sorts you'll transfer and a lot of here.)
Paste in an exceedingly full transcript of the video, whereby subtitle timings are going to be set mechanically.
Type them in as you watch the video.
The folks at YouTube have done some nice things to form that third possibility (typing as you watch) as painless as potential. for instance, if you check a box next to "Pause video while typewriting," it will make the complete method quicker.

4. Simply see the written transcripts of people's videos.

Now you know that YouTube mechanically generates a written transcript for each single video uploaded to its website. Anyone can have access to transcript unless the user manually hides it from viewers.
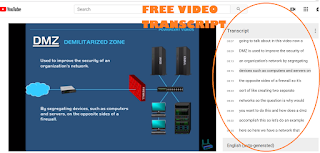
Youtube Free Transcript


I will think about variety of various things wherever video transcripts will are available handy. for instance, perhaps you wish to write down down a quote from a video, however the efforts of pausing-and-typing, pausing-and-typing would drive you up a wall.
Or maybe you would like to search out a selected section of a video.


To see a video's transcript: Open the video in YouTube and press the "More" tab beneath the video title. opt for "Transcript" from the menu.

YouTube's a lot of tag to search out the video transcript.

(If you are not seeing this feature, it's as a result of the user selected to cover the transcript.)

This transcript can seem as a brand new module within the same window. In several cases, the user WHO uploaded the video won't have gone back and manually polished the transcript, thus it will not be good. however it will actually prevent your time and pain.

5. Simply get free transcriptions of your videos and audio files

One more important one with Transcript, As you know, Youtube automatically generates transcript through using highly evolved Speech Recognition Technology, however, if you are looking for a transcription of an audio or video file and do not wish to pay single penny for a service, YouTube's intrinsic captioning system is not a foul place to start out. (There is some cleanup that sometimes needs to be done on the transcript)

To get an automatic transcription for a video: merely transfer your video to YouTube, open it on YouTube's web site, press the "More" tab beneath the video title, and opt for "Transcript" from the menu.
The transcript can seem as a another module within the same window.

To get an automatic transcription for an audio file: you'll have to transfer your recording to YouTube employing a service like TunesToTube. It will take between 2–30 minutes for YouTube to transfer it. Then, follow the same directions for obtaining an automatic transcription for a video.

Thursday, October 18, 2018

How to Setup SFTP server for Free


What exactly SFTP is? And how to Setup SFTP Server


SFTP (SSH File Transfer Protocol) is a secure file transfer protocol and it runs over the SSH and comes with all auth and security that ssh supports. Now-a-days FTP or FTPS is getting replaced by SSH as FTP is considered as not so secure.

The SFTP protocol runs over the SSH protocol as a scheme and it was designed by Tatou Ylonen.
setup SFTP ServerSpecial thing about SFTP is , there are no ports exposed.

SFTP VS. FTPS

People usually wish to check SFTP vs. FTPS. FTPS is essentially the previous ftp protocol run over SSL (Secure Sockets Layer) or TLS (Transport Layer Security).

Benefits of FTP over SFTP includes,
FTPS is essentially FTP, which implies it's code mode, which might corrupt files if the mode isn't properly set and SFTP runs over SSH within the normal SSH port. Thus, no extra ports have to be compelled to be opened on the server and no extra authentication must be maintained. This simplifies configuration and reduces the probability of config errors.
FTPS wants sophisticated firewall configuration and might not work NAT. Ports 989 and 990 have to be compelled to be open. 
FTPS needs an additional server software system package to be put in and patched, whereas SFTP comes with SSH.
What's more, FTPS supports each active and passive modes , that additional complicates firewall configurations and is susceptible to issues.
FTPS can't be used as a File system. 


Here are easy steps to setup Free SFTP server

To setup the Free SFTP server you can download the Rebex Tiny SFTP server
from https://labs.rebex.net/tiny-sftp-server
And surprisingly, it is free for Commericial and Non-commercial purpose.
Once download is finished, unzip the zipped file and run the "RebexTinySftpServer.exe" file.
There would be another file named "RebexTinySftpServer.exe.config" file which is a server configuration file with below config settings available by default.
The configuration is straight-forward , key-value pair and easy to understand.

<?xml version="1.0" encoding="utf-8"?>
<configuration>
<appSettings>
<!-- user and root dir -->
<add key="userName" value="sftpuser"/>    
<add key="userPassword" value="sftpuser"/>
<add key="userRootDir" value="data"/>

<!-- user public keys for public key authentication (optional) -->
<add key="userPublicKeyDir" value=""/>

<!-- misc config -->
<add key="showUserDetailsOnStartup" value="true"/>

<!-- security -->
<add key="rsaPrivateKeyFile" value="server-private-key-rsa.ppk"/>
<add key="rsaPrivateKeyPassword" value="my-super-secure-password"/>

<add key="dssPrivateKeyFile" value="server-private-key-dss.ppk"/>
<add key="dssPrivateKeyPassword" value="my-super-secure-password"/>

<!-- port -->
<add key="sshPort" value="22"/>

<!-- start server when application is started? -->
<add key="autoStart" value="false"/>
</appSettings>

</configuration>

As SSH works on port 22 so config also has the same.
For further security , you can create RSA and DSA keys (.ppk) and provide the password in config which was used while creating the keys.
If you are not comfortable in creating the SSH keys, you can you this awesome free tool that runs on Windows called "PuttyGen" (a utility for RSA and DSA key generation )

Link to download : https://www.chiark.greenend.org.uk/~sgtatham/putty/latest.html

If you are working with any SFTP client and you are just looking for test connection with SFTP Server, you dont need to host one. Rebex has already provided a dummy sftp running server at
test.rebex.net  Use demo as username and password as password


Please Note: REBEX SFTP server store the password in clear text as you can see from the config file.
Do let me know if you have any other SFTP server that can be easily setup.
Incoming search: Rebex sftp firewall issues


Wednesday, May 2, 2018

Avenger Inifinity Wars Ending as per the Comics


Avenger Inifinity Wars Ending as per Comics

So, like everyone else, I was also wondering what would that ending means. Please note this is Spoiler Alert! if you are reading further and you have not watched the Avengers: Inifinity Wars movie yet.


We dont know what would be the strory of  upcoming film Avengers four. But we tend to do shrewdness Marvel handled a similar events once they occurred in comics. Unlike a number of its predecessors like Avengers: Age of Ultron, This movie Avengers: Inifity Wars borrows heavily from the plot of sure Marvel comics and  not just simply settings.

So, what did and how did things happened with Thanos.
 Here’s however the story bound up on the page.

Once More, Spoiler Alert!!!!


Infinity War some of its story from a comic Inifinity and rest of the story from Infinity Gauntlet, the initial story of Thanos, the time Gems and also the huge gold glove. Infinity Gauntlet was a 6 book comic book . This comics had a story about Gems or Inifity Stones connected with Thanos and also the Gauntlet.

And unlike INFINITY WAR , INIFINITY GAUNLET keep going.
So, what happend at the end.

THANOS KILLS HALF OF  THE UNIVERSE WITH THE SNAP OF HIS FINGERS

After look time War, you may simply assume that the majority of time Gauntlet is additionally involved with Thanos making an attempt to amass the time Gems and also the Avengers making an attempt to prevent him. however the primary huge distinction between infinityWar and infinityGauntlet is that the complete finding the infinity Gems thingy is  half  done even before the story starts. In Inifinity Gauntlet story starts off exceedingly in a very spectacular way: Thanos already features a gauntlet in hand with all the GEMS and is considering his new freedom as an powerful guy like a GOD.
And at the CLIMAX, Thanos does the surprising thing: He snaps his fingers and murders the half of the universe. Yes, that what you also see in the movie. Major of the superheros (except the Avengers) dies . The literal disappearance of their darling ones is that the 1st sign most of the Avengers get that something is wrong in the least.

If you are with me, lets continue!
So, what happens next???
Well, the opposite massive distinction between time War and time Gauntlet is that Thanos’ motivations ar entirely totally different. within the comics, as you will have understood. Thanos is totally passionate about winning the center of Mistress Death. Yes, that supersing. Death is the one Thanos is behind. Kind of one sided love. She is the reason he starts collecting the Stones/ Gems. She had asked to kill half of the overpopulating Universe. In a way to impress Death he does some wild things like capturing Nebula and not letting her die. He turns Wolverine's bones to Rubber, changing Thor to glass and shattering the glass so that Death would get impressed by him.
After all his wrong doings,  the more powerful characters (yes, there are more powerful characters than Thanos in the comic world) start seeing him as a potential threat. These characters are Kronos, Epoch, Galactus etc. They had a fight and somehow he wins against all of them.
During the course of time, he decides to transform himself into an astral entity and leave his corporeal form behind, which he believes will rid himself of his final vulnerability.

Unfortunately, he forgets that his godly powers ar predicated on one thing terribly corporeal: His hand being within the time Gauntlet. Nebula, United Nations agency has been mute and apparently insensible to her surroundings when Thanos place her into a continuous state of wretchedness, seizes her probability
She yanks the gauntlet from Thanos’ abandoned body and shoves it onto her own hand, and currently she’s the God within the universe. She reforms her body into health, banishes Thanos into the depths of area and sets regarding combating her new infinite awareness of area and time.
A fight happens between Nebula and Thanos where she ask him to leave the universe as it was 24 hours before and he does that. And here we are, all of our super heroes back to life again.

Tuesday, May 1, 2018

How to Download PDF from Scribd.com for Free


How to View or Download document or PDF from Scribd.com 

This would be one of the most useful tricks of all that you must be in need for.

What Exactly is Scribd.

So, Scribd is a digital library, e-book and audiobook subscription service that includes one million titles. Scribd hosts 60 million documents on its open publishing platform


And download the pdf documents, you need to Register yourself.
But in-case, you found a document on Scribd which you really need but not sure whether this is exactly what you want, you can see a preview. This preview page will have few pages shown from the PDF file and rest of the PDF would be blurred. And what-if you want to see those pages which are blurred.
Here is a simple solution to that problem.


Scribd unblur g33ktricks.blogspot.com
Scribd extension
From your Chrome Browser and go to :https://chrome.google.com/webstore
[ This is Chromes Store for Extensions ]

Here, search for Scribd Unblur.
Install any of these extensions by clicking
"Add to Chrome" button.

Once installed, open scribd.com
Search for the Book you need and Open it.

If the pages are shown blurred.  Click "U" button from top right of your Chrome extension list to Unblur that document.
And its Done.
Now you can enjoy reading the book without any hassle of registering to Scribd.com.

If you find the book useful, be a nice human,  register to Scribd.com and then view or download the book.

This is for educational purpose:
If you need to download that info from the PDF,
Right-click the page and click on "Save-as" option
Save the Complete page as .html file on you computer.
Next time when you want to read the file offline, just double-click to open that file.
And click on Unblur button on chrome to unblur the pages.

Sunday, April 15, 2018

Google Android P might have been named Popsicle


Android P was first released in March, but it’s still known as “Android P” . Google has not named it yet, But intrestingly, in recent Instagram post from Google, Google has released sets of new 5 wallpapers to their followers. (Yes, google do like Instagram and has 6.2M followers)
Here is the link to Google Instagram: https://www.instagram.com/google/

These wallpapers are more like other Google's fancy wallpaper but among them, one stands different from other . Hope this does ring bells. That could be a hint from Google about the name of next release.


Google P = Google Popsicle


Or Google is just being witty and trolling their followers :)

Interestingly, Google named it Pie

Monday, October 9, 2017

How to solve "Move`% s` out of conditional. " error.


[SOLVED] How to deal with "Move `% s` out of conditional." error from Rubocop.

Below is the problem statement.
Problem:
Move `% s` out of the conditional.

where %s is a Method name.
As the method call pointed out that %s is redundant, Rubocop throws this as an error.
What it means is that the method that is common under both condition should be moved outside the Conditions as it would be executed in either of case.
Below the simpler way to look at it and how to resolve it.
Solution:
@bad Code
if condition
  do_x
  do_z
else
  do_y
  do_z
end

@good Code
if condition
  do_x
else
  do_y
end
do_z 

Saturday, May 6, 2017

Inception with Firefox Browser


How to open Chrome Browser inside Firefox Browser

I am sure you must have seen the movie Inception by Christopher Nolan. The movie is based on a wild theory of dreaming inside a dream. Though we cannot dream with Firefox but the trick is to open a browser inside Firefox. Yes, you can open a new browser tab in the browser tab. That sounds confusing as the movie was.
Here is a screenshot to simplify your thought.

Firefox Inception
FireFox Inception


This is what you need to do

  • Open Firefox
  • Type chrome://browser/content/browser.xul  in the address bar
  • Press Enter
Baam! Inception.
Please note: That is .XUL which is XML User Interface Language by Mozilla for building user interfaces of applications like Firefox.

Something to wonder here - how must I have got the screenshot of the webpage in this webpage while creating this webpage.

[SOLVED] Desktop does not Refresh Automatically after copy pasting a file


[Solved] File Pasted on Desktop is not Visible


Like everyone else I also had a problem once with my Windows 7. The Desktop was not getting refreshed automatically. I copied and pasted a file to my Desktop and it was not there. I pressed Ctrl+V and Windows says do "There is already a file with same name in this location". I was surprised, if its there why can't I see it.
After few searches over Google, found the answer to it.

Before we start, A word of caution. Please Create a backup of your Registry. In-case you mess-up (I am sure you wont), backup will resolve.
Steps to Backup Registry:
Click Start 
Type regedit in the search box and click regedit item appearing in the list.
Click Continue, if you're prompted by User Account Control.
From the Left Pane, select Computer
Go to File and then Export and save the registry file.
To restore, just do an "Import" of registry in the registry editor.

Here is what you need to do,

  • Press Windows+R and type regedit 
  • Right click on HKEY_CLASSES_ROOT
  • dont refresh
  • Click "Find"
  • Type dontrefresh in the search box and hit Enter
  • Once search is complete, in the Right pane you will see DontRefresh
  • The Data value will probably be set to '1'
  • dontrefresh
  • Right click on "dontrefresh" and modify the value to '0'
  • Reboot your computer.
That's it, this would resolve the issue 

Monday, March 20, 2017

Difference Between Enterprise Wipe, Device Wipe and Enterprise Reset in MDM


Difference Between Enterprise Wipe, Device Wipe and Enterprise Reset


"Let me do an Enterprise Reset to you device" OR "Let me Wipe your device remotely."You might have heard these words from the IT team if you or your company is using an Mobile Device Management (MDM) application like VMWare AirWatch(older name) or UEM WorkspaceOne.
What does these applications do: They actually provide Mobile Device Management (MDM) service i.e they can manage millions of devices from one place. They can install Customer required applications, files to the device without any intervention required from the device user.
Enterprise Wipe Device Wipe Enterprise ResetSo essentially when a device is enrolled to such service like VMWare AirWatch, it allows the MDM service to access limited area of a phone. 
 [Please note that these services usually don't have any access to the user phonebook, users messages, phonecalls or any personal information. (Moreover, that would be against the Privacy Laws) ] . Once enrolled, a Corporate/Company/Organisation can send Enterprise related data to the devices necessary for their employees to function optimally at the workplace. The data or file , applications would be Enterprise Data and does not belong to user.
And if an employee leaves the Organisation, Organisation has all the rights to delete Enterprise Data and set the device free for user if the device/phone is BYOD(Bring Your Own Device). In this case, The admin of MDM service provider would initiate Enterprise Wipe command.

Enterprise Wipe: 

An enterprise wipe unenrolls the device from MDM service and strips off all enterprise content, including email accounts, VPN settings, Wi-Fi profiles, secure content, and enterprise applications. In this case, Device does not reboot once the Enterprise Wipe is completed. In short, it deletes or removes selective data owned by the company without deleting everything or deleting user data.


Enterprise Reset:

ER enables you to reset a device similar to an enterprise wipe, but with one important difference. Applications,Profiles and files/actions which are set to persist on a device are not removed and automatically get reinstalled on a device following the first reboot after an enterprise reset. Device gets automatically re-enrolled as it was earlier. Its available only on Zebra and Motorola, Honeywell Rugged devices. Consumer devices like Samsung, LG does not usually support this feature. This feature would be used when you want to factory reset the device but you still want to keep the data that was there before resetting.


In Short, Enterprise reset will factory reset your device but will persist the MDM enrollment.

Device Wipe:

Device wipe essentially means - Wiping the Device. 
A Device Wipe reboots the device and removes all data ( includes all personal user information ), email, profiles and MDM capabilities and the phone returns to a factory default state. Its same as that of doing a Factory Reset to your phone from Settings > Personal > Factory Reset.
Once the device is wiped old data on the phone OR the data before enrollment does not exist on the device due to factory reset. Usually, corporate dedicated devices are wiped so that they can be given to the new user.

Please note, device does not actually means a phone. Here, a Device can be a Android Phone, iPhone, Mac systems, Windows systems, Rugged devices.

Update:
Google has come up with new model called A4W/AFW (Android For Work). If you have enrolled your device with Android for Work (Android Enterprise) then on sending the Enterprise Wipe command would un-enroll the MDM agent from the device and performs Factory Reset which would delete everything from the device and makes a device clean like out of box.
Furthermore, there are different enrollment types when you enroll device to MDM in modes like  DA (Device Admin) , AFW - DO (Device Owner), AFW - PO Profile Owner i.e Work Profile , COPE (Corporate Owned Personally enabled), EWP (Enhanced Work Profie)
If you need to understand more about the Work Managed Device and Work Profile Device. You can check here

Update 2.0:
Google now has recommended to their partners to push down the companies and customer to move away from Legacy Device Admin mode. 

Update 3.0:
With all above still available, Google has come one up AMAPI (Android Management API) which is Cloud Platform API from Google that can integrate Google Android UEM functions with different EMM Clients. In Android Enterprise Setup, you can enable the Android Management API framework to manage Android Enterprise devices without the need to have a client app to be installed on the devices for device management. Refer: https://developers.google.com/android/management for more info.

Thursday, March 9, 2017

[SOLVED] WIFI not working after replacing /editing /modifying the wpa_supplicant.conf file


How to solve WIFI not working if WPA_supplicant.conf is modified or changed.

I ran into the problem one day when I was just playing around my Android phone's wpa_supplicant.conf file.
I happily rooted my phone and went to /data/misc/wifi folder and edited the file using root explorer and saved it. Till this point it was all looking so easy. I rebooted my phone and I was surprised after the phone came back from boot.
My Wifi was not at all switching On after replacing the wpa_supplicant.conf file.
Tried many things but did not solve the issue. I was going to factory reset my phone but after long search
 I found the solution to WIFI not working.

The reason was, when we edit the wpa_supplicant.conf file while saving the ownership to file changes, as we will be editing the file as a root.


You can see from the screenshot, the ownername and ownergroup are changed to "root" instead, they should be "wifi"

Resolve WiFi not working wpa_supplicant.conf

Below are simple steps to resolve wifi not working:

$ adb root
$ adb -d shell

# cd /data/misc/wifi
# chown system.wifi wpa_supplicant.conf
# reboot


Hope you find this useful information.
Checkout other tricks in this blog.

Saturday, December 31, 2016

What are the Best ways to make money (Contd.)


Make money by joining LEAPFORCE

Leapforce is a company which provides you an opportunity to work from Home. Yes, you heard it right, you can work from home and earn money. Its an US Based company which provides is to help Search Engines like Google. Your job will be to work as "Personalized Search Engine Evaluator'
There is no joining amount you need to pay to work with leapforce.
But remember Leapforce is independent company which has its own rules and regulations which you need to adhered to.  Leapforce takes contracts from Search engine companies like Bing, google, yahoo and help them to evaluate there search algorithm and inturn help the search engine user with a proper search result match. The search algorithm itself are powerful enough but to judge the actual result what algo returns can be more optimized when a real person evaluates the query.
So, you will be given tasks and instructions on how to perform the task and you need to analyze , research the results provided by a search engine for a particular query.
Queries can be for from Maps, Location, one line questions or misspelled questions which user usually asks.

Skills Required:  People with analytical thinking and good websearch abilities.
You must be having knowledge of Google's product like Google+, Youtube, Google play.


To get hired as Leapforce agent, you need to fill up a form and upload your resume, Then you need to pass some qualification exam to be able to get shortlist for a task or assignment.
If you fail the exam, you still get the second chance to clear it.
Leapforce pays for per hour work and it varies. Its around 13$/hour for US citizens and others can get 7$.hour and payments are done via cheques .

Website: www.leapforceathome.com

Tuesday, December 20, 2016

What are the Best ways to make money (Contd.)


2. Join the Survey websites or Survey Panels

What are Survey Panels??? Survey panels are market research companies which aims for collecting huge samples from different users and they use it themselves or give it to the product development companies. The whole idea it to get what a consumer or common man thinks.
Survey websites are the one where we need to register ourselves and answer to the questions honestly which are being asked in a Survey. These questions can be from any topic e.g do you drink, from which websites you buy groceries or do online shopping.  The length of surveys can be from 5min to 30 mins. The more time consuming the survey will be the more it will pay you. Each survey has a set of points attached to it, once the survey is complete you earn those points. On reaching a stipulated point level , you are entitled to redeem those points.  The points can be redeemed to receive actual money, cash vouchers, gift cards, mobile recharges, food coupons etc.
Thus you can earn 5$ to 10$ per month easily or may be more from just taking surveys and it totally depends on how many surveys you complete.

Skills Required: Able to provide honest answers to the asked question

List of Survey Panel Websites 
Superpayme
Join Opinionbureau
opinionworld
community.xcel-onlinesurveys.com
OpinionOutpost
PaidViewpoint
iPoll


Click Here to know about the next way

Thursday, November 17, 2016

How to Run JAVA games with Android Phones


How to Run Java Games on Android phonesLike everyone else, I to had a question boggling me, whether I can run JAVA games/ app from my Android phones.
The Answer to it is Yes!!!
Yes, you can run the old JAR apps on your android phones using the utility explained below.


Netmite App Runner

You can download the app from PlayStore

Below are the features for Netmite App Runner

  • Among the famous apps to run Java games  & apps  (J2ME/MIDP – jar/jad) app on Android Phones
  • It is integrated with Browser-Browse any j2me site, click to run any jad/jar file.
  • You can immediately port your existing Java apps (jar/jad) to Android WITHOUT source code.
  • App is having integrated File explorer to load the java apps

Using JBED 

1. We need to Root your Android Phone. Rooting now a days is very easy.

2. Download JBED

3. Download lib jbedvm

4. Using ES Explorer, enable root access by going to the Settings.

5. Browse system/lib using the explorer. and copy and paste the lib jbeddm to it.

6. Launch JBED. And, you can normally install any java games on your Android.


Using PhoneME 

1. Install and use phoneMe.

2. Download the "phoneMe Feature" APK from internet and install on your phone.
http://davy.preuveneers.be/phoneme/?q=node/10

3. Also download and install OpenIntents File Manager

4. Download JADGen on PC and create a JAD file for any JAR file using the JADGen.

5. Now, copy both JAD and the respective JAR file into the same folder on your phone.

6. Open the phoneME app and run the game

Using JBLEND 

1. Download the JBlend archive file and extract the contents.

2. Copy the files on your phone.

3. Install the Root Explorer application.

4. Open Root Explorer and tap the "r/w" button in the upper corner. Copy the following files to the destination specified:
ibDxDrmJava.so – /system/lib
libjbmidpdy.so – /system/lib
libjbmidp.so – /system/lib
javax.obex.jar – /system/framework
MetaMidpPlayer.apk – /system/app
MidpPlayer.apk – /system/app

5.Copy the JAR files that you want to run to your phone.

6.Use JBlend to select the files to run them. 

Sunday, November 13, 2016

How To Recover Deleted Facebook Photos, Video , Messages and other stuffs


Trick to Recover Data from Facebook


Recover Deleted Facebook messages Photos
Lets assume you have Uploaded a nice Photo to yours over Facebook and then Deleted the copy of it from your computer. And after a while you deleted the same photo from Facebook as well and you dont have any copy of it. What would you do to get your photo back.
Here is the g33ktrick for you to Recover the Deleted Facebook Photos, Videos and other stuffs from your Facebook page.


The point here is, Facebook keeps all of your data in their archive which is downloadable.


You can Follow the steps and you can get back and have access to your deleted messages, Photos,Videos and all other data of your Facebook profile.

1. Login to your facebook account and Go to General Account Settings.
Here is the link: https://www.facebook.com/settings


2. You will see Download a Copy of your Facebook Data on this page.
Click on "Download a Copy" link

3. This will take you to the next page , here you can see "Download Archive" Button,.
Go ahead and Click on it to .


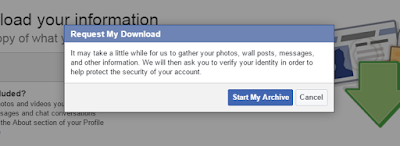
4. On the next screen you will be asked to confirm to Start the Archive of your facebook data as displayed in the screen shot here.
Click on "Start My Archive".


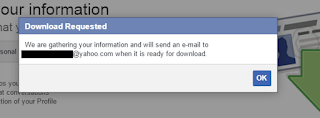
5. Next, you will be told that it will take some time to archive your data and the download link will be sent to your registered email ID .
Wait for Few Minutes and check your mail for facebook download link.


6.  Start downloading the file from the link. Once download is complete, Unzip it. Now you can access all your Photos, Videos. Messages, Friend list etc.
Please note that , the Files will the webpages in .html format. You can just double-click on the file to open and then can see the data on the browser of your choice. From there you just need to Right-click on Photo to save the image.
How to Speed Up Chrome Browser Quickly


Speed-up your Chrome Browser to load page faster


How to make Chrome fastAs you may know, Chrome is one of the popular browser available to us and it is also among the fastest browser. You also might have used it or maybe you are using it now as well and can feel the difference of speed compared to other Web Browsers.
The fact which you might not know is, Google Chrome uses DNS prefetching and speedy (SPDY) protocols instead of HTTP. DNS prefetching and SPDY protocols helps to load the webpage in advance which reduces the time to load the page.
If you are reading this page means something went wrong with your Chrome browser. After using it for many days it tends to slow down. Lately, it has been observed that Chrom has been consuming high amount of RAM even if there is only one tab opened. Offcourse, it does lot in background so consuming high memory is not a surprise.
So, here are the things which you can do to fasten your Chrome Browser application for your desktop machine. This should work for other browsers too.

1. DISABLE THE  PLUGINS or ADD-ONS 

Having many plugins enabled in your browser can slow down it easily as it consumes time to load each and every plugin and moreover it consumes you RAM usage as well. So the best option would be to load the important plugin which you really need and disable the rest. I presonally prefer running zero plugins.
This is how you can disable it.


a. Open Chrome Browser and enter the following address into address bar

chrome://plugins/

b. Now you can Un-tick all the plugins which you think are not at all useful to you.
Please do remember that few plugins like Adobe Flash is required for many websites to display content so you should not disable it and there are some other plug-ins which can help your browser to increase performance.


2. DISABLE EXTENSIONS


a. Open Chrome Browser and enter the following address into address bar

 chrome://extensions/

OR

Click on Wrench icon on your toolbar > Tools > Extensions.

b. Un-tick the extensions which are not needed or can be deleted as well if not required.


3. CLEAR YOUR BROWSING DATA

Browsing data consumes good amount of space. Everytime you visit a webpage, some amount of data from the webpage will be saved on your system so that when you visit the same page again, the data can be loaded quickly. But if your not clearing your browser data, the data continues to increase thus slowing down your browser.

Although cache and cookies are really made to speed up chrome browser but sometimes it happens that they are responsible for decreasing your browsing speed and lagging while opening webpages.


This is how you can clear the data

a. Click on Wrench icon
b. Go to Tools > Clear browsing data.
c. Choose Time range in the dialog box and click on "Clear browsing data"

OR

a. Go to Settings
b. Search for "Clear browsing data"
c. And appropriately select the data that needs to be cleared.

4. Disable any ToolBar you have added to your Browser

Toolbars are your worst enemy. They stay on your browser and do nothing. Toolbars can really slow down the system and the browser. Moreover, I feel toolbars should not be installed at first place.

The Above tips works well for the other browser like FireFox and Internet Explorer as well. Only the path to change the settings will vary.

Hope you like the tips shared. Please do add any other tips if you have in comments.

You can set the Chrome to Dark mode . Check it out here

Thursday, October 27, 2016

How to make mobile a webcam


Make your Mobile phone camera a Webcam

During this Corona virus Pandemic (Covid19), people have been asked to work for home and you will feel the need of having a webcam some or the other day. Teleconferencing gets easier when you see the other person face to face rather than having the voice converstation.
Not everyone has a laptop and not everyone has a Desktop PC with a Webcam. Now a days, not having a camera/webcamera is a big deal. Attending Zoom Calls,Skype Calls, Facebook Live streams and many other applications and website demands you to have a webcam.
How to make your mobile a webcameraWhen I say a webcam , its just a camera which can stream you over internet, hence the name 'web camera' aka webcam.

So, here I am going to tell you about a simple application that I have tried and tested to make your mobile phone as webcam and save money.
As I am talking about Skype video call, I think I should call this post of mine as "How to use Mobile phone as a webcam"


IP WEBCAM
This one is simple yet elegant application which you can install on your android phone from the Play Store.
IP Webcam turns your phone into a network camera with multiple viewing options. View your camera on any platform with VLC player or web browser. Stream video inside WiFi network without internet access.


Features include:
• Video can be uploaded directly to Dropbox, SFTP, FTP and Email using Filoader plugin
• Several web renderers to choose from: Flash, Javascript or built-in
• Video recording in WebM, MOV, MKV or MPEG4 (on Android 4.1+)
• Audio streaming in wav, opus and AAC (AAC requires Android 4.1+)
• Motion detection with sound trigger, Tasker integration.
• Date, time and battery level video overlay.
• Sensor data acquisition with online web graphing.
• Videochat support (video stream only for Windows and Linux via an universal MJPEG video streaming driver)
• Cloud push notifications on motion and sound, cloud recording for motion-triggered records, online video broadcasting powered by Ivideon.
• Extensive baby and pet monitor features: night vision, motion detection, sound detection.

Here is the link for IP WEBCAM. Install the app on your smartphone and Launch it.
There are plenty of things which are there in the mobile app, which you don't need to worry about.

Next Step is to Download the configuration software.
Download from https://ip-webcam.appspot.com/

After installing the PC app and launching it, below screen will be shown
Click on Auto Detect.

Settings window

If everything works fine, the camera will be available in Windows software. If something is wrong, please check your firewall rules and your network by visiting your network camera in a web browser.

For example, in skypeTry restarting your PC if it does not work.
After restart, launch any application
say Skype and you can then configure your skype with the IP Cam.
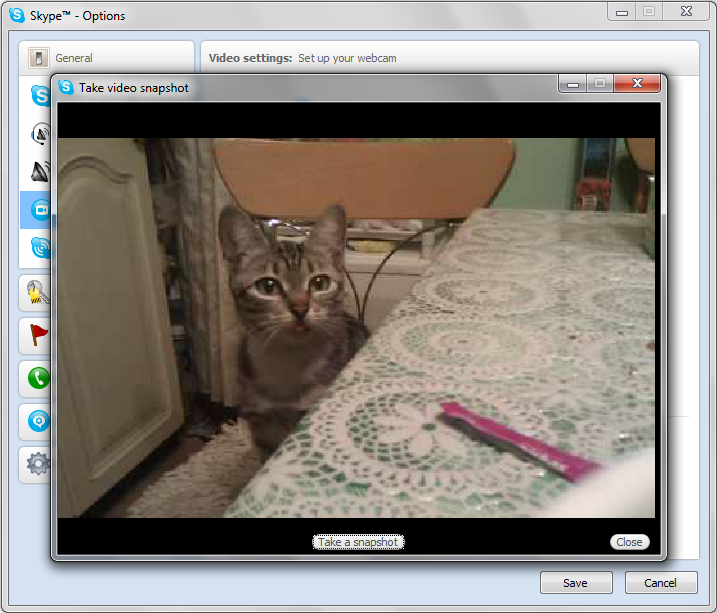
In Skype, Go to Tools - Options - Video Settings .
Here You need to choose, MJPEG Camera
And Baam!!! all done.

You can see your pretty cat over your PC by using your phone.

In the similar way, you can config any Streaming application . You just need to use MJPEG camera as a webcam source.

Another App I remember which you can use is, 
DroidCam. It also has mobile app and a PC connectivity software.