G33K-TRICKS

Wednesday, February 3, 2016

How to Install Numpy python module on Windows [SOLVED]


Simple, tried and tested steps to install Numpy module


Pre-requisite, would be "You are already having Python installed on your system"
Next Download the Numpy module from https://pypi.python.org/pypi/numpy
 [I downloaded the Zipped one, so can you  ;) ]

Unzip the downloaded Numpy and go to
C:\Users\<USERNAME>\Downloads\numpy-1.10.4\numpy-1.10.4
using command prompt. This is where setup.py is available.

Now type commands,
python setup.py build

If building does not throw any errors , run
python setup.py install

In-case you see some error similar to error: Unable to find vcvarsall.bat
Which implies you dont have Microsoft Visual studio to build the module.

Either you can download one or there is another way of doing it.
Download, MinGW (32/64) from http://sourceforge.net/projects/mingw/files/

Select ‘download latest repository catalogues’.
Next you select a folder (i.e. C:\MinGW) and the programming support you require: C and C++  (I kept Fortran and ObjC as deselected).
You need "MinGW Developer Toolkit" installed.
If you select this option you’ll get MSYS as well.
H
Next thing you need to do is to configure your PATH environment variable.

Right-click on My Computer and Select Properties
Go to the tab ‘Advanced’ and select ‘Environment variables’
Select ‘Path’ from the ‘System Variables’ and click the ‘Edit button’
Add the following paths to your variables: ‘C:\MinGW\bin;'  (without quotes)

Now, Edit / Create new file  "distutils.cfg" at C:\Python26\Lib\distutils\distutils.cfg with following change

[build]
compiler=mingw32

Remember, in case you created new file distutils.cfg , the file type should be CFG not TXT
To avoid this, while saving select "Save As" option and then in the "Save as Type" drop down select
"All Files" . Then in the "Filename" field type distutils.cfg and then save.

Open new command prompt and again go to  C:\Users\<USERNAME>\Downloads\numpy-1.10.4\numpy-1.10.4
Run, 
python setup.py build

And if no issues seen,
Run,
python setup.py install


And its Done!!!


Thursday, October 15, 2015

Increase Browsing Speed


How to Boost your Internet Browsing Speed


Sometimes you might notice that your browsing speed just gone slow even though you are on high bandwidth connection.
Boost your Internet speed on Windows machine
So here is the solution to it.

To solve the issue of "my download speed is high but my browsing speed is low" try the following
g33k trick

Open Command prompt as an Administrator.
For that you need to Right click on CMD application and select "Run as Administrator" option

Now,
enter following

C:\windows\system32>netsh interface ipv4 show subinterfaces


Which results:


   MTU  MediaSenseState   Bytes In  Bytes Out  Interface
------  ---------------  ---------  ---------  -------------
4347436345      1          0        18327511   Loopback

  1500          1       746930     629532     WAN OR Local Area connection


Check the "Interface" column has WAN or Local Area Connection

Now ping the google.com server with below command


C:\windows\system32>ping www.google.com -f -l 1500

Which results:

Pinging www.google.com [216.58.196.100] with 1500 bytes of data:
Packet needs to be fragmented but DF set.

If you are seeing above print message , that means your system is set with wrong MTU value and which needs to be optimised.

To optimize the MTU value we need to do the following exercise until we get the optimum number
Ping google with another value less that 1500.

C:\windows\system32>ping www.google.com -f -l 1472

Which results:

Pinging www.google.com [216.58.220.36] with 1472 bytes of data:
Reply from 216.58.220.36: bytes=64 (sent 1472) time=133ms TTL=52
Reply from 216.58.220.36: bytes=64 (sent 1472) time=58ms TTL=52
Reply from 216.58.220.36: bytes=64 (sent 1472) time=67ms TTL=52
Reply from 216.58.220.36: bytes=64 (sent 1472) time=63ms TTL=52

One More time:

C:\windows\system32>ping www.google.com -f -l 1460

Pinging www.google.com [216.58.220.36] with 1460 bytes of data:

Reply from 216.58.220.36: bytes=64 (sent 1460) time=60ms TTL=52
Reply from 216.58.220.36: bytes=64 (sent 1460) time=63ms TTL=52
Reply from 216.58.220.36: bytes=64 (sent 1460) time=58ms TTL=52
Reply from 216.58.220.36: bytes=64 (sent 1460) time=101ms TTL=52

Here you can notice the Time taken for packets for 1460 is 60ms and for 1472 it was 133
We can do more iterations to get the less time taken number.
For me MTU 1465 was giving good result.


C:\windows\system32>ping www.google.com -f -l 1465

Pinging www.google.com [216.58.220.36] with 1465 bytes of data:

Reply from 216.58.220.36: bytes=64 (sent 1465) time=59ms TTL=52
Reply from 216.58.220.36: bytes=64 (sent 1465) time=61ms TTL=52
Reply from 216.58.220.36: bytes=64 (sent 1465) time=62ms TTL=52
Reply from 216.58.220.36: bytes=64 (sent 1465) time=65ms TTL=52

Once you know the MTU optimum number, you can set it via command line with below command.

C:\windows\system32>netsh interface ipv4 set subinterface "Local Area Connection" mtu=1465 store=persistent

In case you have WAN as an interface you need to type following command.

C:\windows\system32>netsh interface ipv4 set subinterface "WAN" mtu=1465 store=persistent

Thats all!!!
Hope you will notice the speed change in browsing webpages.

Thursday, September 17, 2015

Simple hack to unmask any website's password


Easy hack websites password and if it's masked in the password field


I was amazed when I came to know that its damn simple to see someone's password.

This is what you need to do:

Step 1: Open the webpage for which you have to unmask or hack the password.


For example, the facebook password is masked here


Step 2: Right Click on Password Field.

Step 3: Select "Inspect Elements" option .


Step 4: On selecting option , "Inspect Elements", a geeky pane will open at the bottom of the screen.
Do not worry!!! Notice the below line,
<input type="password" class="inputtext" name="pass" id="pass" tabindex="2">


You just have to replace , type="password" to  type="text"
And press Enter
That's all!!!


Saturday, September 5, 2015

How to remove an Application (apk) from an Android Phone using command


Simple steps to Remove APK using Command line


Have you ever want to remove an android app from your own android device and that stubborn thing  just don't want to leave your device.
Yeah!!! its simple to Remove right, you can just  go to Settings > Apps and Uninstall

What if you can 
First you need to have and Rooted Phone. If its not rooted, then you are in little deep trouble.

Connect you phone to your PC/Laptop
If your PC  already have phone's drivers, you can see your Phone getting mounted in My Computer

Next you need an adb utility. If you don't have get it from here.

Once connected,
Open CMD prompt and goto the path where you have kept the adb utility.

Now type, adb devices and hit enter
e.g
C:\My Downloads> adb devices

This command will return the serial number of your phone. If it does not return anything in that case, you need to enable the USB Debugging from the "Developer Settings" .
[ And again, if you dont have Developer option not available in your Settings, goto Settings > About Phone> tap 5/7 times on "Build Number" and it will be available under Settings ] 

After getting assured that the phone is connected via adb.
type , adb root

C:\My Downloads> adb root

On rooted phone, an pop up will appear asking for root permission. It depends on which app you have used to permit ownership as "Super User".
Grant the permission from the phone.

Now type, adb shell

This will take you to the android shell (which is ofcourse linux based, and if you have busybox binary installed in your phone , you can do much more with this tool)

Now from the shell prompt type, cd /data/app
This will take you to user apps folder.
the path would look like,


Screen-shot  (In my case, I went to adb shell first and then ran "su" command to get the root permission.)

Now type,
root@xyz: ls | grep -i "<appname_to_remove>"

Say, the app name is "whatsapp"

root@xyz: ls | grep -i "whatsapp"

This will result in getting, the list of app(s) with the app you want to remove.
If you have given a proper apk name. The ls command will list it.

Then just remove that app, thats all

 root@xyz: rm com.<appname_to_remove>.apk


Remove apk usng command line


You have to remove only the app which is shown in the list after ls | grep -i <> and please make sure the app name which you are removing is correct. Coz, once gone is gone when you remove it using rm command.

After this, just reboot the phone using Power key or type, adb reboot


Search Queries:
How to remove app using command
app not getting removed from android phone

Monday, June 30, 2014

How to Bypass Android Unlock Pattern / Password / Face / PI on Android Phones


Android Unlock Pattern

How to Bypass Unlock Pattern / Password / Face/ PI on Android Phones


Forgetting things is Human Tendency!!! So as to say, To Err is human.
The most difficult thing that you would have to remember is Passwords and adding to all these we have so called "Patterns" in our Android Mobiles.
#Android Many a times we do change that Unlock Pattern  to secure our mobile and there are chances we may forget it as well.
So, what to do, when you forget your Unlock Pattern of your Android Mobile.


Here it goes, one more simple g33k-trick to help you out.
1. First and foremost thing you need is a utility called "adb" (android debug bridge). For more details about Android Adb and how to do its setup click here. (if you have any questions on setup, post it in comments, I will be glad to answer them as well :) )

Android Unlock Pattern2. Once Adb is set, open a command prompt and make sure you run command prompt as "Admin" mode.
Press Windows key 
type cmd
Right click on cmd application
Click on "Run as administrator"


To confirm devices is detected on your pc, type  in cmd prompt:
adb devices
This will give you  a device ID connected to your PC. If its listed move ahead with below steps. 
If no device is shown, Check whether you have enabled "USB Debugging" option from the "Developers Option".

3. Type the below lines as it is one by one and  press enter after every line.

METHOD 1:

adb shell 
cd /data/system/
rm gesture.key


METHOD 2:

adb shell
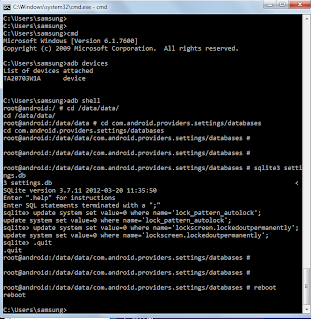
cd /data/data/com.android.providers.settings/databases
sqlite3 settings.db
update system set value=0 where name=’lock_pattern_autolock’;
update system set value=0 where name=’lockscreen.lockedoutpermanently’;
.quit
Android Unlock Pattern


4. Once finished with above task, Reboot your android device.

5. After reboot, you will notice that the phone wont be asking for any pattern lock to unlock .
And Pattern is asked, just connect any 4 dots and phone will get unlock :)

Now you can set a new Pattern and make sure you remember it this time .

P.S:  For connecting the device to the PC you should be having respective USB drivers installed on your host pc. Without drivers, mobile
will not be recognized 

Friday, March 7, 2014

How to Measure Throughput (while Uploading or Downloading)


Say ..you want to measure the throughput while uploading or downloading a file...how would you do that...
The answer is Wireshark...a packet sniffing tool.
This tool will measure the throughput upto the exact value as it uses the packets as a real medium for reference.
So, this is how you do it...
Download and install Wireshark

Open Wireshark and a similar window will appear

From top-left panel (Capture) select "eth1". After that the following window will appear
At this time Wireshark is ready to obtain information of all packages that travel on this interface
Start uploading a file from this screen.
You will observe that some colourful rows start appearing on the screen. These are nothing but packets.

   Return to Wireshark window and start looking for all streaming packages. Once package transit stops go to: Capture Menu and select Stop


   Once we have all these information we can continue analyzing it
Go to Edit Menu & select  Find Packet


Following pop-up window will appear


Select String on “Find By” section, type "POST" and press "Find"

From all packages, one of them will be highlighted (the one that contains the string "POST" that is located at the beginning of sent file) you can verify this information on the bottom panel


8.    Once this package was identified, as previous explanation, this is the first package uploaded so is needed to take it as initial reference and this can be done, doing right click and selecting "Set Time reference" option


9.    In Time column of this package the word *REF* will appear, and after it all times will be restarted. Select again this package and doing again, right click select "Follow TCP Stream" option.


10. Other window will appear with all information contained on this package. The goal is to obtain a string located at the end of it. So we need to scroll down and copy the string that starts with "WebKitFormBoundary.xxxxxxxxxxx" (this string changes randonmly)


After select and copy this string we need to follow previous steps to find this string on the stream

Edit > Find Package


NOTE: we need to repeat this step, 2 times in order to find the package that contains this string at the end.

At the same way the package that contain this information will be highlighted, with measured time to upload this file (to verify that this package contains desired string look at below panel, and at the end string will appear)


With this time we can obtain Mbps for this test converting file size to bits (multiplying by 8) and divide it by this time


Saturday, August 31, 2013

Send SMS Free from your PC


How to send free SMS

Send Free SMS
Free SMS
In these days of Whatsapp, there are still people who dont have access to Whatsapp. They are still using a non-Android/non-iPhone/non-Windows Phone which does not support Whatsapp.
So they have to use the old traditional way of sending the SMS .
What if ....
You dont have a phone and you need to send a urget SMS or 
You ran out of prepaid balance  or
You are not ready to spend a SMS which is of high tarrif or 
You need to chat with your boyfriend/girlfriend over SMS

For such situations, we have a solution. Send an SMS using a website.
How a website sends an SMS...You can read here

There are plenty of website all over the world for sending a SMS
Few of them are mentioned below
Personally I use, 160by2.com and way2sms.com

1. www.160by2.com
2. indyarocks.com
3. way2sms.com
4. atrochatro.com
5. freesms.com ( you can send international SMSes as well) 

There are few websites for which you dont need to register

1. www.bollywoodmotion.com
2. www.afreesms.com ( you can send international SMSes as well) 
3. www.txt2day.com


How a website sends SMS to a mobile phone


1.The SMS is composed by using a web application which is stored on HTTP server.
2.This application executes the requests on that server and then sent the request through the internet (“using the cloud”) as an email message.
3. The email is received by a Short Message Service Gateway [ SMS Gateway ] .  which then converts the message from an email message to a actual SMS message.
4. Now this SMS message is then handed over to a Short Message Service Center  [ SMSC ] , which is a server that routes the SMS to an individual mobile phone based on the mobile phone number.
5. The message is finally transmitted over the wireless network to the recipient.


You may also like to read :
http://g33ktricks.blogspot.com/p/the-rtsp-real-time-streaming-protocol.html

Thursday, August 29, 2013

How to use Whatsapp from computer


How to Use Whatsapp on PC for Windows and Mac

7 Easy steps to run Whatsapp to your computer.


To Run Whatsapp on PC, We will Require Android Emulator.


www.g33ktricks.blogspot.com
The Android SDK includes a mobile device emulator — a virtual mobile device that runs on your computer. The emulator lets you develop and test Android applications without using a physical device.
And moreover, Android Emulator Helps us to Run Whatsapp on PC.

Step 1:- Youwave And Bluestack Are the Two
Android Emulator which enable us to Run Whatsapp
or any other Android App on PC.

Step 2:- If you Go for Bluestack then Download and
install it, then run the Bluestack and Click
on " Apps "
Then Click on the Tab "Social " and select "Whatsapp" and Install it.


Step 3:-  Personally, I was using Youwave, you have to just install . I mean , "Next" "Next" "Next" "Finish".

Now download Whatsapp.apk and move the downloaded file to PC directory. 

Step 4:- To Check PC's Directory, Open Youwave click on help >> Instruction. 
Now move your whatsapp.apk file in to that directory . Then Click on View then Redraw Icons.  Now You will see Whatsapp icon .  

Step 5:- Once the application is successfully installed, Go to My Apps and click on WhatsApp . You will be asked for the country and phone number. Enter both and confirm the details.

Step 6:- In the next screen you have to enter the six digits code to activate your phone number. 
You can use "Call Me" option.
After receiving the call on your phone, you've to enter that code to activate service 

Step 7:- Thats all..Sync all the contacts, add new ones 
And you are ready to use Whatsapp

You may like Apple iPhone Secrets

Wednesday, August 21, 2013

HOW TO's with AT commands


How to check To which COM port MODEM is connected

A: 
Right Click On MY Computer Icon
Select "Manage" option
From the new window, select "Device Manager" 
From here, you can check for the Ports and Modems 
Double clicking , will display the properties

For Windows system you need to have "Hyperterminal" application
Windows 7 , they have removed the application (Don't know why)
but there are many free available Applications like Hyperterminal 
over the internet.

For Linux users, "minicom" is the best
To install, sudo apt-get install minicom


Q: How To Send SMS From Computer Using  AT Commands

A:
1. Plug In Your GSM/GPRS modem
2. Check to which COM port the modem is connected  
3. Start-> Accessories-> Communication-> Hyperterminal
4. Open new connection
5. "Connect using:" the correct COM port, you will see a
windows->change Bits per second to "9600" (for GSM) "115200" (for GPRS) 
6. Type "AT" and press Enter (it'll show "ok")
7. Type "AT+CMGF=1" and press Enter (it'll show "ok". It is to set the GSM / GPRS modem to operate in SMS text mode. )
8. Type " AT+CMGW="+91723456789"" and press Enter (it'll show ">"."+91" is country code, "723456789" is recipient's number) 
9. Start typing SMS. When finished, press Ctrl + Z (it'll show "+CMGW:1", it means the message is 
stored as index:1 in the message storage) 
10. Type "AT+CMSS=1" and press Enter (It'll show something like "+CMSS: 219". "219" is the reference no of the sent message) 
11. If it shows "OK" at the end, it means the message is successfully sent.


Q: How To Receive SMS Using Computer 
A:
1. Plug In Your GSM/GPRS modem
2. Find out which COM Port the modem is connecting 
3. Start-> Accessories-> Communication-> Hyperterminal
4. Open new connection
5. "Connect using:" the correct COM port, you will see a
windows->change Bits per second to "9600" (for GSM) "115200" (for GPRS) 
6. Type "AT" and press Enter (it'll show "ok")
7. Type "AT+CMGF=1" and press Enter (it'll show "ok". It is to set the GSM / GPRS modem to operate in SMS text mode. )
8. Type "AT+CMGL="ALL" " and press Enter (there is message received, it'll show 
" +CMGL: 1,"REC READ", "+651234567",,"01/08/13,11:26:20+12
Hi, Love You !!! " ) 


Q: How To Check SMS Delivery Status Report & Newly Received Message
A:
1. Follow the Step 1 To 6 as  mentioned above 
2. At The Hyper Terminal, Type The Following AT Command

AT+CSMP=49,167,0,0 
OK
AT+CNMI=2,2,0,1,0 
OK
AT+CMGS="Mobile Number" 
> Message content displayed (Ctrl+Z)
+CMGS: 72
OK
+CDS: 6,228,"Mobile Number",129,"08/10/22,10:08:35+32","13/08/22,12:55:38+32",0
+CMT: "Mobile Number",,"13/10/22,12:56:17+32"
testing


Q: How To Change the Baud Rate of the Modem using AT Commands

A: 
To Change Baud Rate from xxxx to yyyyyy
1. Start-> Accessories-> Communication-> Hyperterminal
2. Open new connection
3. "Connect using:" the correct COM port, you will see a
windows->change Bits per second to "xxxx"
4. Type "ATE1" and press Enter (it'll show "ok")
5. Type "AT+IPR=yyyyyy" and press Enter (it'll show "ok")
6. Click on "disconnect" icon
7. Go to Properties and change the Bits per second to "yyyyyy"
8. Type "AT&W" and press Enter (it'll show "ok")
Then it'll be changed to yyyyyy


here : xxxx can be 5600 and  yyyyy : 115200
AT Commands And There Usage


AT commands also called as Attention Commands or Hayes Command
AT commands can be used to collect information from the modem device or the network and can help you troubleshoot modem specific issues. Below are the list of AT commands that most of the Modems uses.
AT Commands Meaning
AT+CSCA="+651234567" Set Message Center Number
AT+CGMI Get the name of manufacturer
AT+GMI Get the ID of manufacturer
AT+GMM Get the Model information
AT+CGSN Get IMEI number (International Mobile Equipment Identity)
AT+CGMR Get software version
AT+CIMI Get IMSI number (International Mobile Subscriber Identity)
AT+CNUM MSISDN
AT+CPAS Get mobile phone activity status
AT+CREG Get mobile network registration status
AT+CSQ Get radio signal strength
AT+CBC Get battery charge level and battery charging status
ATD, ATA, etc Establish a data connection or voice connection to a remote modem
ATD, ATA, AT+F* Send and receive fax
AT+CMGS, AT+CMSS Send SMS messages
AT+CMGR, AT+CMGL Read SMS messages
AT+CMGW Write SMS messages
AT+CMGD Delete SMS messages
AT+CNMI Obtain notifications of newly received SMS messages
AT+CPBR Read phonebook entries
AT+CPBW Write phonebook entries
AT+CPBF Search phonebook entries
AT+CLCK Opening or closing facility locks
AT+CPWD Changing passwords
AT+CMEE=n Enable certain error messages 

n= 0 disable +CME ERROR: result code and use ERROR instead. 

n= 1 enable +CME ERROR: result code and use numeric values. 

N= 2 enable +CME ERROR: result code and use verbose values.
AT+COPS=, , Change the GSM network  is used to select whether the selection is done automatically by the ME or is forced by this command tooperator given in the format and may be: 

= 0 automatic ( field is ignored). 
= 1 manual. 
= 2 deregister from network. 
= 3 set only
= 4 manual / automatic (if manual selection fails, automatic mode is entered). 
= 0 long alphanumeric (default value). 
= 1 short format alphanumeric
= 2 numeric
string type given in format ; this field may be up to 16 character long for long alphanumeric format, up to 8 characters for short alphanumeric format and 5 characters long for numeric format MCC/MNC codes)
AT+CBST Change bearer service type
AT+CRLP Change/configure radio link protocol parameters
AT+CPMS Storage of SMS messages
AT+CSAS Save configurations of the GSM/GPRS modem
AT+CRES Settings related to SMS messaging such as the SMS center address
AT+CMGF=1 Instruct the GSM / GPRS modem to operate in SMS text mode
AT+CMGL="ALL" List all the messages
AT+CNMA New message acknowledgement


Check out  this post : "HOW TOs with AT Command"