G33K-TRICKS: android
Showing posts with label android. Show all posts

Saturday, August 1, 2020

Complete Guide and steps to Install, Setup and Remove Test DPC app


how to uninstall test DPC

What is Test DPC

TestDPC / Test DPC is an app that is used for testing Device Policy Controller for Android Devices. This app was released by Google first in 2015. This app is smart enough to fool your Android device thinking that it is being used under a corporate context. If you are an Android App developer and want to test a specific behaviour of your app under the conditions when the device would be enrolled to Work Managed or Work Profile Mode by an EMM like WorkspaceOne Intelligent Hub.
Once you set the device to Device Owner or Work Managed / Work Profile mode using the TestDPC app, you can verify the remote app performance.
If you want to understand more on Work Managed and Work Profile, you can refer this article: Difference-between-Work-Profile-and-Work-Managed-Profile
And if you are here to see how to uninstall VMware Workspace One Hub, you can refer to this link - https://g33ktricks.blogspot.com/2022/09/how-to-Uninstall-vmware-workspaceone-Intelligent-hub-android.html

This app can be downloaded easily from the below official links and there are other links from where you can download it too.

Test DPC Git Hub Download Link: https://github.com/googlesamples/android-testdpc
The Source code is available for Free for this app in GitHub, so you can play around with it.

What Test DPC app does?

Android Device comes with Device Policy Controller (DPC) which controls most of the device Settings. These settings can be controlled manually, that you do from Settings but these can be also can be controlled by Enterprise Mobility Management) ISVs (Independent Software Vendor) OEMs (Original Equipment Manufacturer) 
Users can manage security polices , can set applications restrictions and much more things using this app. It also has as a implementation reference for other DPCs.
For using Test DPC app, device Rooting is not required.

List of APIs available in Test DPC app

Below are the images from the Test DPC app 7.0 and the complete list of Policy Management APIs available within the app. Few of the setting in the main menu will have Sub-Settings which are not included in the list of screenshots.
 
Here is the list of few of the DPC commands followed by Screenshots from the test DPC apk.
Suspend apps, Unsuspend apps, Clear app data, Managed configuration, Disable metered data , app feedback notification, App restrictions manager,  Delegated cert installer, generic delegation, lock task mode, Manage app permissions,Wipe etc.

.
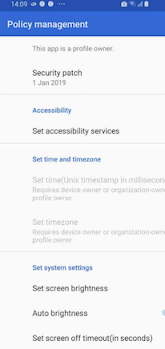
List of APIs Methods available in Test DPC app                   List of APIs Methods available in Test DPC app                List of APIs Methods available in Test DPC app


List of APIs Methods available in Test DPC app                 List of APIs Methods available in Test DPC app               List of APIs Methods available in Test DPC app

List of APIs Methods available in Test DPC app                 List of APIs Methods available in Test DPC app              
List of APIs Methods available in Test DPC app                 List of APIs Methods available in Test DPC app          
List of APIs Methods available in Test DPC app                 List of APIs Methods available in Test DPC app               List of APIs Methods available in Test DPC app


Installing test DPC

For setting the device to Device Owner or Work Managed Mode, you can use the adb command without factory resetting the mobile device. The Current or the latest version available is for test DPC app is 7.0.

Steps for Installing testDPC app from Google Play Store

- To install, you must connect your Gmail account to your Android device.
- To download from Play Store
- Click ‘Accept’ for permissions and let it download
- Once Test DPC is installed from Play Store. 
- Follow the steps below given in the   Test DPC Initial Setup section

Steps for Installing testDPC app via command line via apk

- After downloading, go to Device Settings and then Security.
- Search for ‘Allow installation of apps from unknown sources’ and enable the option.
- Install any APK using below steps
  (Here is the complete guide to setup ADB on your machine - https://www.xda-developers.com/install-adb-windows-macos-linux)

- Install the DPC apk from adb
 adb install <TestDPC.apk>

- And run below command to set the dpc app as Device Owner.
 adb shell dpm set-device-owner com.afwsamples.testdpc/.DeviceAdminReceiver

- In case you want to test the Profile Owner mode, you need to run below command instead of above Device Owner command
 adb shell dpm set-profile-owner com.afwsamples.testdpc/.DeviceAdminReceiver

Test DPC Initial Setup:

Below screenshots would explain you the initial setup.
Launch the Test DPC app after installing and follow the instructions as given below.

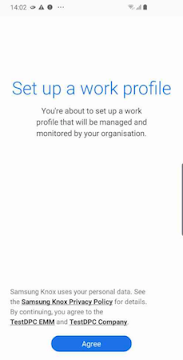
Installing and settting Test DPC app             Installing and settting Test DPC app            Installing and settting Test DPC appInstalling and settting Test DPC app            Test DPC in Personal container              Test DPC in Work Profile


Test DPC is one of the best Device Policy controller for Android devices and it is compatible with devices running on Lollipop (Android 5.0) and higher. 

Uninstalling / Removing Test DPC apk

 By now you must have understood, this app is very useful but I would suggest you to uninstall it once you are done with your work. Keeping it on your device and playing around it might land you in trouble.
Here are the steps to follow for removing the Test DPC app/apk.
From the below screenshot from the device you can see that there is a Wipe Option to clear the dpc set up from the device.

                                                             Test DPC Wipe option
- Launch the Test DPC application 
- Search for "Wipe" option 
- Click "Ok" on the prompt
- Remove the test DPC Apk from Device Apps list,  Go to Device Settings > Apps > search app and click Uninstall

 I see that people do look for removing other DPC apps like thinkadam dpc, Intelligent Hub from VMware or Microsofts Intune. Just to let you know, there is no way to remove these apps. If your device is enrolled as Device Owner, un-enrolling it would factory reset the device. If its enrolled as Profile owner there are chances but the only thing that blocks it is ofcourse the IT team of your company. If they have installed it on your device, they do not want it to remove it. If you want the DPC apps like mentioned above, to be removed from you mobile device, you need to contact to your IT team. 

NOTE: Sooner, the testDPC will be out of sight and will be over taken by AMAPI. The new concept that would control your device instead of DPC apps. Click here , if you want to learn more about AMAPI.

You might also like to look at this quick small article on Android emulator Camera Surprise : Android-emulator-camera-surprise

Saturday, February 29, 2020

Difference between Work Profile and Work Managed Devices in MDM world


Work Managed vs Work Profile devices

Work Profile vs Work Manged devices

In my previous article, I'd mentioned about the different modes which MDM involves along with the difference between Enterprise Wipe, Device wipe and Enterprise Reset. During Recent change in strategy from Google, company is trying to focus more on the Work Managed mode and will have moved their focus out from Legacy i.e Device Admin mode. The Android 10 i.e Android Q and above version will be predominantly Android Enterprise mode supported.
Let me try to explain, the difference between these two primary modes Work Managed and Work Profile.


What are Work Managed Device :

 They are also referred as Android Work Managed or Device Owner  or Android for Work (AFW) . Device enrolled under this mode, gives entire control of the device to the MDM or to say - your IT Department. There are different method with which your company may enrol the device. The VMware WorkspaceOne UEM (earlier famously known as AirWatch) does have below different method of enrolment available.
  • Using AirWatch Relay to perform an NFC bump 
  • Using a unique identifier or token code
  • Scanning a QR code
  • Using Zero Touch enrollment
  • Other specific to Rugged devices like Barcode enrollment for Zebra device via StageNow app

Primarily, the device would be owned by company i.e Corporate Owned or Corporate Dedicated.
So these devices and the data will be owned by the company after enrolled in Work Managed mode. Since the device is owned by the company that you work for , once you leave the company, Admin department can wipe the device which would Factory Reset the device. Factory resetting means getting all the data deleted from the device and device again become a fresh out of box as a new device. When it comes to un-enrolment, unenrolling the Work Managed Device Factory Resets it so device can be assigned to another user.


What are Work Profile Devices:

Work Profile Enrolled Device
 Device Enrolled in Work Profile
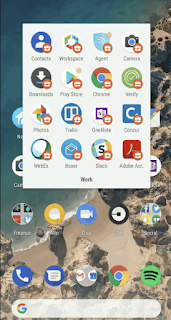
It is also referred as Profile Owner. This method is mainly used on BYOD (Bring Your Own Device) devices where the company allows you to use your own device at work but along with your personal info your companies data can reside in parallel. This method would only work on Android devices which are Lollipop 5.0 and above. In words of Google, a Work Profile separates work apps and data on an Android device from personal apps and data. By default, work profile notifications and icons for apps installed in a work profile are marked with a work badge (briefcase icon) so you can
distinguish them from personal apps. Refer the pic on the right, the Google Chrome has to icons, One with work badge and another at the homescreen without work badge. The work badge is the managed app by your company and company has all the rights to track its usage (ofcourse , if they want to) and personal one i.e without badge stays safe to use for your personal use. Work profiles allow an IT department of your company to securely manage a work environment without restricting users from using their device for personal apps and data.
So, once your device is enrolled in Work Profile , if you leave the organisation, your IT department will un-enroll the device which will wipe i.e. delete the data owned by company without touching any of your personal data. Thus, in case of Work Profile enrolled device, unlike Work Managed,  the Device does not get Factory Reset (for obvious reasons), thus you can continue to use your device and not bothered by companies applied restriction profiles to your phone.

There is a one more category to the list which is called Dedicated Device.
These devices are basically owned by the company and are used for specific purpose. Devices like Kiosk, Ticket Printers device, Entry Exit managing devices. These devices do not need to have a person to operate as they will be standalone and will be in Lock Down mode, where only one app/screen will be shown to the device user. As the usage is within the single app or limited set of apps, the users are restricted to use any other option or change any settings on the device. From Airwatch, they have an application called as AirWatch Launcher which does perform these operations i.e keep the device user bound to one or few specific apps and not letting the customer edit or personalise the settings. 

For now, you try to remember these acronyms and I will add some more details about other mode like COPE in my future post. BYOD stands for Bring Your Own Device; CYOD stands for Choose Your Own Device; COPE stands for Company Owned/Personally Enabled; and COBO stands for Company Owned/Business Only.

You can refer to this page for understanding what is Device Wipe and Enterprise Wipe
Interested in knowing, how to manage Airwatch WorkspaceOne console via Mobile and How to uninstall WorkspaceOne Intelligent Hub 

Friday, November 15, 2019

Android Emulator Camera Surprise


Android Emulator CameraWhile working on a emulator for android on Android Studio, I stumbled upon this surprise feature.
The Android Emulator Camera will allow you to roam inside a predefined Room with your Emulator camera. You can snap of any item in the room or you can record a video with that simulated camera.
Moving across the room is pretty simple.
The feel of moving the camera as if you are really moving with your phone in hand is great.
Try it yourself by Downloading the Android Studio and launching the Android emulator from the Studio.


Tuesday, July 9, 2019

How to set Dark Theme for Google Chrome mobile


Set Dark Theme on Chrome Mobile Application

One of the most used and famous browser everyone knows of is Google Chrome. The browser supports multiple platform like Windows, Mac, Android, iOS. The ease of use and quick webpage rendering and hundreds of useful extensions makes it highly used web browser.

Coming back to the topic, as of now Google has no roadmap to allow user to Set Dark Theme, so, here are few g33ktricks to allow you to set the Dark Theme OR set Night Mode on Android Chrome browser.

1. Set Dark Theme using Chrome Flag

1. Update the Chrome to the latest version from Play Store.
    Open PlayStore app - > Search Google Chrome -> Click on "Update" button

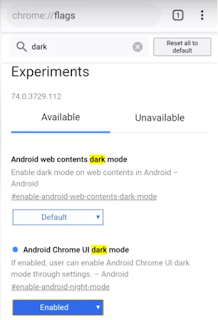
2. Open the Browser and type the URL – chrome://flags
Chrome Flags Setting Page
Chrome Flags Page
3. Now Search for the term ‘Dark’.

4. Two options will be shown
Android web Contents Dark Mode
 and
Android UI dark mode.

5. Web Contents Dark Mode - This will make the content on the website dark
UI dark mode - This will make the Chrome UI dark leaving the content on the site unaffected.

6. Make your choice accordingly. Close the Google Chrome app and the Launch it again.

7. The Night Mode or Dark Theme will be set and the webpages will be having black background and white text.
You can reset this setting back by opening Chrome Settings and click on "Dark Mode" option.


2. Using Reader Mode

Reading mode shows the webpages like pages on the book providing ease of reading by removing Javascripts, ads etc.

Steps to enable Reader mode

1. Open Chrome app and Tap 3 dots on the Right-Top of the screen

2. Click on "Settings"

3. Search for "Accessibility" option and swithch-on the "Simplified" view.

4. Now Open any of  the web-page you like. Bottom of the screen will shown an option ‘Show Simplified View’. Click on it.
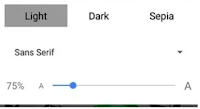
Chrome Flag Appearance Option
5. This will again show "Appearance" option again.

6. Simply increase the intensity of Dark in the given options.


You might like to read: How to Speed-up your Chrome Browser