G33K-TRICKS: Computers
Showing posts with label Computers. Show all posts

Friday, August 16, 2019

Windows Snipping shortcut in Mac OSX


How to Take Screenshots on Mac OSX

Windows has great deal of features which Mac does not having matching with. Like the MS Paint that is on Microsoft Windows but the equivalent for Apples Mac which is "Preview.app" is not so great.
Microsoft Windows10 has introduced the versatile Snipping tool that can quick take a screenshot or part of the screenshot which can be saved or directly copy pasted in MS Paint or Word etc.
The easy shortcut that can be used to do Screen Snipping on Windows operating system is Windows key + Shift + S
But when it comes to Mac's OSX as a new user I found it after lot of search.
There are three ways to take screenshot on Apple's Mac machines

1. Command + Shift + 4 then Space Bar 
This takes the complete screenshot of a screen. Once you hit the Space bar , the Mouse Icon would change to Camera Icon


2. Command + Shift + 4
This would allow you to select portion of the screen take as a snapshot. Usually, these screenshots get saved to the Desktop

3. Adding Control Key i.e Command + Control + Shift + 4 


This would allow you to create the snapshot and keep it in the Clipboard
From Clipboard , you just can paste it anywhere you want. That means, you dont need to save the file on Desktop to use it.

And then there is Screenshot.app which is built-in in MAC machines. The above shortcuts uses the same app.

With all new upgrade from Apple, macOS Mojave has one more snipping shortcut.
It is Shift + Command + 5 , this would launch the screenshot.app itself where you can do more than just taking the screenshots. The tool includes, Recording the entire screen or just a portion of the screen

Tuesday, July 16, 2019

How to Login VMware Airwatch Console from your Mobile


VMware UEM Console Login from Mobile


Simple way to access VMware Airwatch WorkspaceOne UEM Console from your Mobile web browser.
Airwatch WorkspaceOne UEM console
As an Airwatch Admin, sometimes you would be looking for a way to access your Airwatch workspaceone UEM console from mobile but when you enter the console address in mobile web-browser like Chrome,


Firefox , the console redirects the page and takes you to the (https://<YourConsoleAddress>/DeviceManagement/Enrollment/ ). The screen would look like the one shown here.
Enrolment screen UEM console

Note that, this is not strage behaviour . As a MDM , Vmware Airwatch must be having a way to enroll the device via web-browser. So this redirection to enrollment page is obvious. Once you enter appropriate Group ID i.e Organisation Group ID , the next page would be to download , Install and Run Workspace One Intelligent Hub from Google Play Store.
But this is what we dont want.
To get an access to the console login page,
you need to append /Airwatch to the console address.


So the address would be  https://<YourConsoleAddress>/Airwatch
This would take you to the admin login page.
Please note that Loging in from mobile web-brower might not render the pages correctly and you might see some glithes. My recommendation would be to Login the page from Desktop Browsers only.

WorkspaceOne UEM mobileUEM console Mobile Login Screen


Sunday, April 7, 2019

Top 5 Killer YouTube Tricks


Top Five awing YouTube Tricks that will blow your mind

I am listing down here few Killer Youtube tricks that I am definitely sure you would need someday.

1. Generate a youtube-link that starts a YouTube video at a definite certain time.

Ever wished to send somebody a YouTube video, however purpose them to a selected moment or timeframe in the video

Instead of causing your friends the final YouTube link and instructing them to jump to the 0:34 minute spot, you'll really send them a selected YouTube time-link that would get started from the point whichever you have shared them.

Here are the Steps to follow:

Youtube Time Stamp
Youtube Video Time Stamp
To create a link that starts a YouTube video at a definite time: Open up the video and click on "Share" to the way right of the video title. Then, within the window of choices that is shown check the box next to "Start at:" and kind within the time (in hours:minutes:seconds) you wish. As an alternative, you can pause the video at the time you wish it to start and autofill will help.


On  click,  you will see a tag add itself to the YouTube link. Merely copy that link and paste it where you need or share it on any network.

2. You can convert any YouTube video into a GIF


gif-youtube-video-trickEveryone loves GIFs, however knowing the way to build them is not public knowledge. Well, it ought to be, as a result of all it takes may be a very little YouTube trick.

To create a GIF from a YouTube video: play a video on YouTube  just add the word "gif" right before the name of the youtube link.
Thus the link reads, "www.gifyoutube.com/[video-link]"


This will bring you to gifs.com, together with your video already uploaded and prepared for writing. Here, you will find a menu of choices to the left pane. At Gif.com you can do multiple things like, edit, crop, set time of the video etc.

G33k-trick to form a GIF from a YouTube video.

Click on "Create GIF" on the top-right and it will prompt you for a GIF title and set of tags. Then click "Next," and you've got a handy landing page from that to share your newly minted GIF. Only small catch here is you need to signup to gif.com to download the video.


3. You can facilitate your video get found in search engine by writing or uploading a transcript. 

This is one of the Youtube SEO hack shared by Ryan Stewart who suggest , if possible , you can upload the Transcript of your video in the description of your YouTube Video to get higher rankings in search engine listing. This is because, Google scrutinize variety of things once ranking videos in search to work out what your video is concerning, and your transcript is one in every of them.

To add a transcript to your video: Open the video on YouTube, and you will see a row of icons just under the play button. Click the icon on the way right for "Subtitles/CC." (CC stands for "Closed Captions.) YouTube closed captioning (CC).

Set your language if you haven't already. Then, you may then be prompted to decide on among 3 other ways to feature subtitles or closed captions to your video ...


Upload a pre-written text transcript or a regular subtitles file. (Learn a lot of concerning the file sorts you'll transfer and a lot of here.)
Paste in an exceedingly full transcript of the video, whereby subtitle timings are going to be set mechanically.
Type them in as you watch the video.
The folks at YouTube have done some nice things to form that third possibility (typing as you watch) as painless as potential. for instance, if you check a box next to "Pause video while typewriting," it will make the complete method quicker.

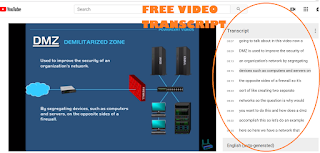
4. Simply see the written transcripts of people's videos.

Now you know that YouTube mechanically generates a written transcript for each single video uploaded to its website. Anyone can have access to transcript unless the user manually hides it from viewers.
Youtube Free Transcript


I will think about variety of various things wherever video transcripts will are available handy. for instance, perhaps you wish to write down down a quote from a video, however the efforts of pausing-and-typing, pausing-and-typing would drive you up a wall.
Or maybe you would like to search out a selected section of a video.


To see a video's transcript: Open the video in YouTube and press the "More" tab beneath the video title. opt for "Transcript" from the menu.

YouTube's a lot of tag to search out the video transcript.

(If you are not seeing this feature, it's as a result of the user selected to cover the transcript.)

This transcript can seem as a brand new module within the same window. In several cases, the user WHO uploaded the video won't have gone back and manually polished the transcript, thus it will not be good. however it will actually prevent your time and pain.

5. Simply get free transcriptions of your videos and audio files

One more important one with Transcript, As you know, Youtube automatically generates transcript through using highly evolved Speech Recognition Technology, however, if you are looking for a transcription of an audio or video file and do not wish to pay single penny for a service, YouTube's intrinsic captioning system is not a foul place to start out. (There is some cleanup that sometimes needs to be done on the transcript)

To get an automatic transcription for a video: merely transfer your video to YouTube, open it on YouTube's web site, press the "More" tab beneath the video title, and opt for "Transcript" from the menu.
The transcript can seem as a another module within the same window.

To get an automatic transcription for an audio file: you'll have to transfer your recording to YouTube employing a service like TunesToTube. It will take between 2–30 minutes for YouTube to transfer it. Then, follow the same directions for obtaining an automatic transcription for a video.

Tuesday, May 1, 2018

How to Download PDF from Scribd.com for Free


How to View or Download document or PDF from Scribd.com 

This would be one of the most useful tricks of all that you must be in need for.

What Exactly is Scribd.

So, Scribd is a digital library, e-book and audiobook subscription service that includes one million titles. Scribd hosts 60 million documents on its open publishing platform


And download the pdf documents, you need to Register yourself.
But in-case, you found a document on Scribd which you really need but not sure whether this is exactly what you want, you can see a preview. This preview page will have few pages shown from the PDF file and rest of the PDF would be blurred. And what-if you want to see those pages which are blurred.
Here is a simple solution to that problem.


Scribd unblur g33ktricks.blogspot.com
Scribd extension
From your Chrome Browser and go to :https://chrome.google.com/webstore
[ This is Chromes Store for Extensions ]

Here, search for Scribd Unblur.
Install any of these extensions by clicking
"Add to Chrome" button.

Once installed, open scribd.com
Search for the Book you need and Open it.

If the pages are shown blurred.  Click "U" button from top right of your Chrome extension list to Unblur that document.
And its Done.
Now you can enjoy reading the book without any hassle of registering to Scribd.com.

If you find the book useful, be a nice human,  register to Scribd.com and then view or download the book.

This is for educational purpose:
If you need to download that info from the PDF,
Right-click the page and click on "Save-as" option
Save the Complete page as .html file on you computer.
Next time when you want to read the file offline, just double-click to open that file.
And click on Unblur button on chrome to unblur the pages.

Saturday, May 6, 2017

Inception with Firefox Browser


How to open Chrome Browser inside Firefox Browser

I am sure you must have seen the movie Inception by Christopher Nolan. The movie is based on a wild theory of dreaming inside a dream. Though we cannot dream with Firefox but the trick is to open a browser inside Firefox. Yes, you can open a new browser tab in the browser tab. That sounds confusing as the movie was.
Here is a screenshot to simplify your thought.

Firefox Inception
FireFox Inception


This is what you need to do

  • Open Firefox
  • Type chrome://browser/content/browser.xul  in the address bar
  • Press Enter
Baam! Inception.
Please note: That is .XUL which is XML User Interface Language by Mozilla for building user interfaces of applications like Firefox.

Something to wonder here - how must I have got the screenshot of the webpage in this webpage while creating this webpage.

[SOLVED] Desktop does not Refresh Automatically after copy pasting a file


[Solved] File Pasted on Desktop is not Visible


Like everyone else I also had a problem once with my Windows 7. The Desktop was not getting refreshed automatically. I copied and pasted a file to my Desktop and it was not there. I pressed Ctrl+V and Windows says do "There is already a file with same name in this location". I was surprised, if its there why can't I see it.
After few searches over Google, found the answer to it.

Before we start, A word of caution. Please Create a backup of your Registry. In-case you mess-up (I am sure you wont), backup will resolve.
Steps to Backup Registry:
Click Start 
Type regedit in the search box and click regedit item appearing in the list.
Click Continue, if you're prompted by User Account Control.
From the Left Pane, select Computer
Go to File and then Export and save the registry file.
To restore, just do an "Import" of registry in the registry editor.

Here is what you need to do,

  • Press Windows+R and type regedit 
  • Right click on HKEY_CLASSES_ROOT
  • dont refresh
  • Click "Find"
  • Type dontrefresh in the search box and hit Enter
  • Once search is complete, in the Right pane you will see DontRefresh
  • The Data value will probably be set to '1'
  • dontrefresh
  • Right click on "dontrefresh" and modify the value to '0'
  • Reboot your computer.
That's it, this would resolve the issue 

Sunday, August 14, 2016

Trick to Play Pokemon GO on computer


Requirement

Enable USB debugging on your smartphone .
(For that developer option should be enabled)

2nd thing you need is, adb drivers install on you pc.
Incase you dont have, google is the answer ;)


Now here the tricks starts.
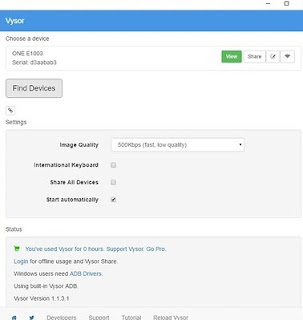
You need to install Vysor on your Chrome Browser.
Download it from here 

Then install Vysor app from Google play on you phone.

Once all installations are done, you are ready to go.
Connect your smartphone to Computer to proceed for playing PokemonGO.

The moment you connect the phone, Vysor app will get installed on you phone too(in case you did not install)

The screen of your phone will appear on your computer .
You can then open the Pokémon GO app on the phone.
You will see it played in a window on your monitor.

Now you can wait for Pokemon to come to you and you can easily catch them using mouse instead of dragging your fingers on your mobile screen
And its easy for you to do multi tasking, you can use your computer and can play in between.

If your mobile screen goes off, and you have a new Pokemon near you,  the phone will vibrate and letting you know that , its time to Catch'em all.


Friday, June 24, 2016

Audio Testing Links for headphones and speakers


How to Test your Headphone and Speaker


Found a  nice Audio testing Website which I wanted to share with you all.


There are plenty of Audio test files which you can directly run over your browser and then you can put your Headphones or Speaker to test.


For Audio tests on your headphones 
http://www.audiocheck.net/soundtests_headphones.php


List of other Sound / Audio tests
http://www.audiocheck.net/soundtestsaudiotesttones_index.php

Saturday, April 16, 2016

How to change the resolution of videos or images : Quick and easy steps


Change the Image and Video Resolution using FFMPEG Tool


Changing the video resolution can also be termed as Scaling the Video / Resizing the Video.
How to change the video resolution
Image Resizing

One of the easiest way for manipulating the videos is to use FFMPEG tool.
FFMPEG is a free software that can produce libraries and programs for handling multimedia input. It can decode, encode, transcode, mux, demux, stream, filter and play pretty much anything that humans and machines have created.


You can download ffmpeg tool from here based on your OS

FFMPEG uses the libswscale library to scale the input video.
[The scale filter forces the output display aspect ratio to be the same of the input, by changing the output sample aspect ratio.
If the input image format is different from the format requested by the next filter, the scale filter will convert the input to the requested format.]

For all the options available with FFMPEG scaling you can see
http://ffmpeg.org/ffmpeg-filters.html#toc-Options-1


Examples:

ffmpeg -i input_file.avi -vf scale=320:240 output_file.avi


With the above command the aspect ratio will also change. If you want to keep the aspect ratio same after changing the video resolution you have to specify only one component, either width or height. And have to set the other component to -1.

Example:
ffmpeg -i input_file.jpg -vf scale=320:-1 output_file_320.png

The above commands will work with Image files as well.
You can change the image resolution using the ffmpeg tool too.

You may also like visit few other pages:
http://g33ktricks.blogspot.com/2016/03/how-to-disable-microsoft-onedrive.html
http://g33ktricks.blogspot.com/2016/03/hack-web-sites-using-hexjector.html
http://g33ktricks.blogspot.com/2016/03/how-to-view-cams-for-free-all-over-world.html

Tuesday, March 22, 2016

How to disable Microsoft OneDrive


Disable MS OneDrive

Steps to Disable Microsoft OneDrive 


Are you annoyed of Windows 10 Microsoft OneDrive.

You have come to right place.
There are many ways to
disable Microsoft OneDrive and Remove OneDrive from File explorer.


For Windows 10 Home Edition this is what you need to do.

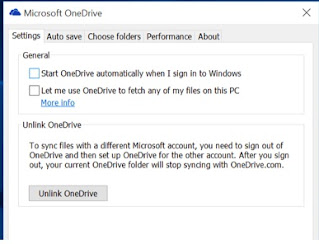
Right-click the OneDrive icon in your notification area (little white cloud) and then choose Settings.
Disable MS OneDriveUncheck the “Start OneDrive automatically when I sign in to Windows” Option and save your settings.
OneDrive won’t load at Windows Startup from now on..
If you are not planning to use OneDrive, you can click on the “Unlink OneDrive” button .
It will stop OneDrive from syncing to the Clouds.


For Windows 10 Professional  or Enterprise or Education Edition you need to ,
Press the Windows key to open the Start menu’s search box.
Type "gpedit.msc"and press Enter
This will open the Group Policy Editor.
Now go to :

Local Computer Policy > Computer Configuration > Administrative Templates > Windows Components > OneDrive

Now, Double-click on the “Prevent the usage of OneDrive for file storage” policy setting in the right pane and click on “Enabled” and then click  on “OK”

It will disable the access to OneDrive. OneDrive will be hidden from File Explorer.

Sunday, March 20, 2016

Ethical hacking of web sites using "HEXJECTOR"


Hexjector is an Opensource, Multi-Platform PHP script to automate site Penetration test for SQL Injection Vulnerabilities.


The Tools has following features...

1.Check for SQL Injection Vulnerablities.
2.Pentest SQL Injection Vulnerablities.
3.Web Application Firewall Detector.
4.Scan For Admin Page
5.Manual Dump Function
6.SQL Injection Type Detection
7.Search For Vulnerable Sites by using Google Dork
8.WAF Bypass
9.Multithreaded(HexaFind)


Download Hexjector here:-  sourceforge
Webhacking made easy with Hexjector.

Saturday, March 19, 2016

How to view Live web Cams for free all over the world


Free Webcams search queries


Did you know that , you can get an easy access to IP web cameras throughout the world for free.
These Live Web Cams are always available over the internet.
You just need to search the Free Cams over the internet, thats all.

Using google , type and search below links and you will see the list on unprotected Cams at different places in the world.
The fun part is, for few cams you can pan and zoom using the available on screen remote control.

The trick lies behind the search list is to use the Google Search keywords. For example, the inurl keyword from Google help you find out the URLs that contains certain word or text. Similarly, the intitle keyworkd finds the list of Titles that has certain text. 

Here is the List of Free Live IP Web Cams around the world 

Watch Free Live Cams

inurl:/view.shtml
intitle:”Live View / - AXIS” | inurl:view/view.shtml^
inurl:ViewerFrame?Mode=
inurl:axis-cgi/jpg
inurl:axis-cgi/mjpg (motion-JPEG)
inurl:ViewerFrame?Mode=Refresh
inurl:view/indexFrame.shtml
inurl:view/index.shtml
intitle:start inurl:cgistart
inurl:view/view.shtml
intitle:”live view” intitle:axis
liveapplet
intitle:snc-z20 inurl:home/

intitle:liveapplet
inurl:"viewerframe?mode=motion"
intitle:”i-Catcher Console - Web Monitor”
intitle:axis intitle:”video server”
intitle:liveapplet inurl:LvAppl
intitle:”EvoCam” inurl:”webcam.html”
intitle:”Live NetSnap Cam-Server feed”
intitle:”Live View / - AXIS 206W”
intitle:”Live View / - AXIS 210″
intitle:”Live View / - AXIS”
intitle:”Live View / - AXIS 206M”
inurl:”MultiCameraFrame?Mode=Motion”

intitle:Axis 2400 video server
intitle:"snc-rz30 home" 
allintitle:”Network Camera NetworkCamera”
inurl:indexFrame.shtml Axis
intitle:”WJ-NT104 Main Page”
intitle:”sony network camera snc-p1″
intitle:snc-cs3 inurl:home/
intext:”MOBOTIX M10″ intext:”Open Menu”
intext:”MOBOTIX D10″ intext:”Open Menu”
intext:”MOBOTIX M1″ intext:”Open Menu”
intitle:”netcam live image”
intitle:”Toshiba Network Camera” user login
intitle:snc-rz30 inurl:home/
intitle:”sony network camera snc-m1″
site:.viewnetcam.com -www.viewnetcam.com


Another website which is sort of free directory to Public Cams,
Hundereds of free surveilance webcams across globe are listed in one place.
Live Camera Project: http://insecam.org/
How to get Nonencrypted password using Website Login Form


On Few websites you can just verify the password directly using the PHP or Java Script code.
Though not always , you can get the password with few easy steps.

1. Right-Click on the "Login Form" of the website which you want hack.
2. Select ''Inspect element''
3. Search for  ''
and then ''action=''  in the code

4. If the URL ends with  ''.js'' Bingo!!! you hit the bullseye. Just copy it and paste it in the URL bar of your browser.
And in-case if the URL ends with ''.php'', type ''view-source:'' before pasting the URL
Then search for  ''password'' in the source code.

WARNING: This method works better for .JS pages than with .PHP.
Sometimes, there is no URL after ''action='' you will find just a JS function.
Again view source and look for "password".


How to hack the Website password


Wednesday, February 3, 2016

How to Install Numpy python module on Windows [SOLVED]


Simple, tried and tested steps to install Numpy module


Pre-requisite, would be "You are already having Python installed on your system"
Next Download the Numpy module from https://pypi.python.org/pypi/numpy
 [I downloaded the Zipped one, so can you  ;) ]

Unzip the downloaded Numpy and go to
C:\Users\<USERNAME>\Downloads\numpy-1.10.4\numpy-1.10.4
using command prompt. This is where setup.py is available.

Now type commands,
python setup.py build

If building does not throw any errors , run
python setup.py install

In-case you see some error similar to error: Unable to find vcvarsall.bat
Which implies you dont have Microsoft Visual studio to build the module.

Either you can download one or there is another way of doing it.
Download, MinGW (32/64) from http://sourceforge.net/projects/mingw/files/

Select ‘download latest repository catalogues’.
Next you select a folder (i.e. C:\MinGW) and the programming support you require: C and C++  (I kept Fortran and ObjC as deselected).
You need "MinGW Developer Toolkit" installed.
If you select this option you’ll get MSYS as well.
H
Next thing you need to do is to configure your PATH environment variable.

Right-click on My Computer and Select Properties
Go to the tab ‘Advanced’ and select ‘Environment variables’
Select ‘Path’ from the ‘System Variables’ and click the ‘Edit button’
Add the following paths to your variables: ‘C:\MinGW\bin;'  (without quotes)

Now, Edit / Create new file  "distutils.cfg" at C:\Python26\Lib\distutils\distutils.cfg with following change

[build]
compiler=mingw32

Remember, in case you created new file distutils.cfg , the file type should be CFG not TXT
To avoid this, while saving select "Save As" option and then in the "Save as Type" drop down select
"All Files" . Then in the "Filename" field type distutils.cfg and then save.

Open new command prompt and again go to  C:\Users\<USERNAME>\Downloads\numpy-1.10.4\numpy-1.10.4
Run, 
python setup.py build

And if no issues seen,
Run,
python setup.py install


And its Done!!!


Thursday, October 15, 2015

Increase Browsing Speed


How to Boost your Internet Browsing Speed


Sometimes you might notice that your browsing speed just gone slow even though you are on high bandwidth connection.
Boost your Internet speed on Windows machine
So here is the solution to it.

To solve the issue of "my download speed is high but my browsing speed is low" try the following
g33k trick

Open Command prompt as an Administrator.
For that you need to Right click on CMD application and select "Run as Administrator" option

Now,
enter following

C:\windows\system32>netsh interface ipv4 show subinterfaces


Which results:


   MTU  MediaSenseState   Bytes In  Bytes Out  Interface
------  ---------------  ---------  ---------  -------------
4347436345      1          0        18327511   Loopback

  1500          1       746930     629532     WAN OR Local Area connection


Check the "Interface" column has WAN or Local Area Connection

Now ping the google.com server with below command


C:\windows\system32>ping www.google.com -f -l 1500

Which results:

Pinging www.google.com [216.58.196.100] with 1500 bytes of data:
Packet needs to be fragmented but DF set.

If you are seeing above print message , that means your system is set with wrong MTU value and which needs to be optimised.

To optimize the MTU value we need to do the following exercise until we get the optimum number
Ping google with another value less that 1500.

C:\windows\system32>ping www.google.com -f -l 1472

Which results:

Pinging www.google.com [216.58.220.36] with 1472 bytes of data:
Reply from 216.58.220.36: bytes=64 (sent 1472) time=133ms TTL=52
Reply from 216.58.220.36: bytes=64 (sent 1472) time=58ms TTL=52
Reply from 216.58.220.36: bytes=64 (sent 1472) time=67ms TTL=52
Reply from 216.58.220.36: bytes=64 (sent 1472) time=63ms TTL=52

One More time:

C:\windows\system32>ping www.google.com -f -l 1460

Pinging www.google.com [216.58.220.36] with 1460 bytes of data:

Reply from 216.58.220.36: bytes=64 (sent 1460) time=60ms TTL=52
Reply from 216.58.220.36: bytes=64 (sent 1460) time=63ms TTL=52
Reply from 216.58.220.36: bytes=64 (sent 1460) time=58ms TTL=52
Reply from 216.58.220.36: bytes=64 (sent 1460) time=101ms TTL=52

Here you can notice the Time taken for packets for 1460 is 60ms and for 1472 it was 133
We can do more iterations to get the less time taken number.
For me MTU 1465 was giving good result.


C:\windows\system32>ping www.google.com -f -l 1465

Pinging www.google.com [216.58.220.36] with 1465 bytes of data:

Reply from 216.58.220.36: bytes=64 (sent 1465) time=59ms TTL=52
Reply from 216.58.220.36: bytes=64 (sent 1465) time=61ms TTL=52
Reply from 216.58.220.36: bytes=64 (sent 1465) time=62ms TTL=52
Reply from 216.58.220.36: bytes=64 (sent 1465) time=65ms TTL=52

Once you know the MTU optimum number, you can set it via command line with below command.

C:\windows\system32>netsh interface ipv4 set subinterface "Local Area Connection" mtu=1465 store=persistent

In case you have WAN as an interface you need to type following command.

C:\windows\system32>netsh interface ipv4 set subinterface "WAN" mtu=1465 store=persistent

Thats all!!!
Hope you will notice the speed change in browsing webpages.

Saturday, August 31, 2013

Send SMS Free from your PC


How to send free SMS

Send Free SMS
Free SMS
In these days of Whatsapp, there are still people who dont have access to Whatsapp. They are still using a non-Android/non-iPhone/non-Windows Phone which does not support Whatsapp.
So they have to use the old traditional way of sending the SMS .
What if ....
You dont have a phone and you need to send a urget SMS or 
You ran out of prepaid balance  or
You are not ready to spend a SMS which is of high tarrif or 
You need to chat with your boyfriend/girlfriend over SMS

For such situations, we have a solution. Send an SMS using a website.
How a website sends an SMS...You can read here

There are plenty of website all over the world for sending a SMS
Few of them are mentioned below
Personally I use, 160by2.com and way2sms.com

1. www.160by2.com
2. indyarocks.com
3. way2sms.com
4. atrochatro.com
5. freesms.com ( you can send international SMSes as well) 

There are few websites for which you dont need to register

1. www.bollywoodmotion.com
2. www.afreesms.com ( you can send international SMSes as well) 
3. www.txt2day.com


Thursday, August 29, 2013

How to use Whatsapp from computer


How to Use Whatsapp on PC for Windows and Mac

7 Easy steps to run Whatsapp to your computer.


To Run Whatsapp on PC, We will Require Android Emulator.


www.g33ktricks.blogspot.com
The Android SDK includes a mobile device emulator — a virtual mobile device that runs on your computer. The emulator lets you develop and test Android applications without using a physical device.
And moreover, Android Emulator Helps us to Run Whatsapp on PC.

Step 1:- Youwave And Bluestack Are the Two
Android Emulator which enable us to Run Whatsapp
or any other Android App on PC.

Step 2:- If you Go for Bluestack then Download and
install it, then run the Bluestack and Click
on " Apps "
Then Click on the Tab "Social " and select "Whatsapp" and Install it.


Step 3:-  Personally, I was using Youwave, you have to just install . I mean , "Next" "Next" "Next" "Finish".

Now download Whatsapp.apk and move the downloaded file to PC directory. 

Step 4:- To Check PC's Directory, Open Youwave click on help >> Instruction. 
Now move your whatsapp.apk file in to that directory . Then Click on View then Redraw Icons.  Now You will see Whatsapp icon .  

Step 5:- Once the application is successfully installed, Go to My Apps and click on WhatsApp . You will be asked for the country and phone number. Enter both and confirm the details.

Step 6:- In the next screen you have to enter the six digits code to activate your phone number. 
You can use "Call Me" option.
After receiving the call on your phone, you've to enter that code to activate service 

Step 7:- Thats all..Sync all the contacts, add new ones 
And you are ready to use Whatsapp

You may like Apple iPhone Secrets

Thursday, August 1, 2013

Call the World for Just Free of Cost


List of applications for making Free Calls


Here we are in the era where
World has become a "Global Village"
Call the World for Just Free of CostAnd its good that we have a communication access to connect to any part of the world, and the best part is
when it is free.
Yes, there are services around the internet to call anyone just for free. You can make free calls. You  just need an internet connection, a computer, speakers/headphone and a mic.
Though Paid one are always there with some extra sophisticated services.
Below is the table that would give an overview.

Receive Calls SMS Voicemail Mobile OS Supported
JAJAH YES YES NO YES Web-based
ooVoo YES YES NO NO Win, Mac
Skype YES YES YES YES Win, Mac, Linux
iCall YES NO YES YES Win
VoxOx YES YES YES NO Win, Mac
Vyke NO YES NO YES Web-based
Yahoo! Voice YES YES YES YES Web-based, Win, Mac
FriendCaller NO NO NO YES Web-based
vBuzzer YES YES YES YES Web-based, Win, Mac
VoipBuster NO YES NO YES Win
MOBIVOX YES YES NO NO Web-based
Line2 YES NO YES YES Mobile (iPhone)
MagicJack YES NO YES NO Win, Mac
Vonage YES NO YES YES N/A
Google Voice YES YES YES YES Web-based
Tru YES YES YES YES Mobile
Fring YES NO NO YES Mobile
EvaPhone NO NO NO NO Web-based
PC-Telephone YES NO YES NO Win
Rebtel YES YES NO YES N/A
MyCallingBox NO NO NO NO Web-based
Miglu NO YES NO NO Web-based
Voxtopia YES NO YES YES Mobile
PokeTalk NO YES NO NO Web-based
WebPhone NO NO NO NO Win
GMail YES NO NO NO Web-based
My-B-line NO NO NO NO Windows
PowerVoip NO YES NO YES Win, Mac, Linux, Web-based
uVOIPit NO NO NO NO Windows